How to Sketch a Room in Xactimate the Right Way


5 min read
Once you’ve scoped the project and aligned with the property owner, the next critical step is sketching the room in Xactimate accurately. A good sketch is the foundation of a great estimate.
But getting that information into Xactimate can feel overwhelming, especially if you’re not yet comfortable with the platform’s many tools and shortcuts. You may find yourself double- or triple-checking measurements, and that’s for a good reason: precision is everything when preparing an estimate.
Xactimate is a powerful but complex tool = so complex, it might as well come with its own graduate degree. That’s why I asked two of our in-house experts, Chris Tilkov and Christopher Muto, to walk you through exactly how to sketch a room the right way. (Disclaimer: You do not have to be named Chris to become an expert in this tool.)
What Is “Xactimate Sketch” and Why is it Important?
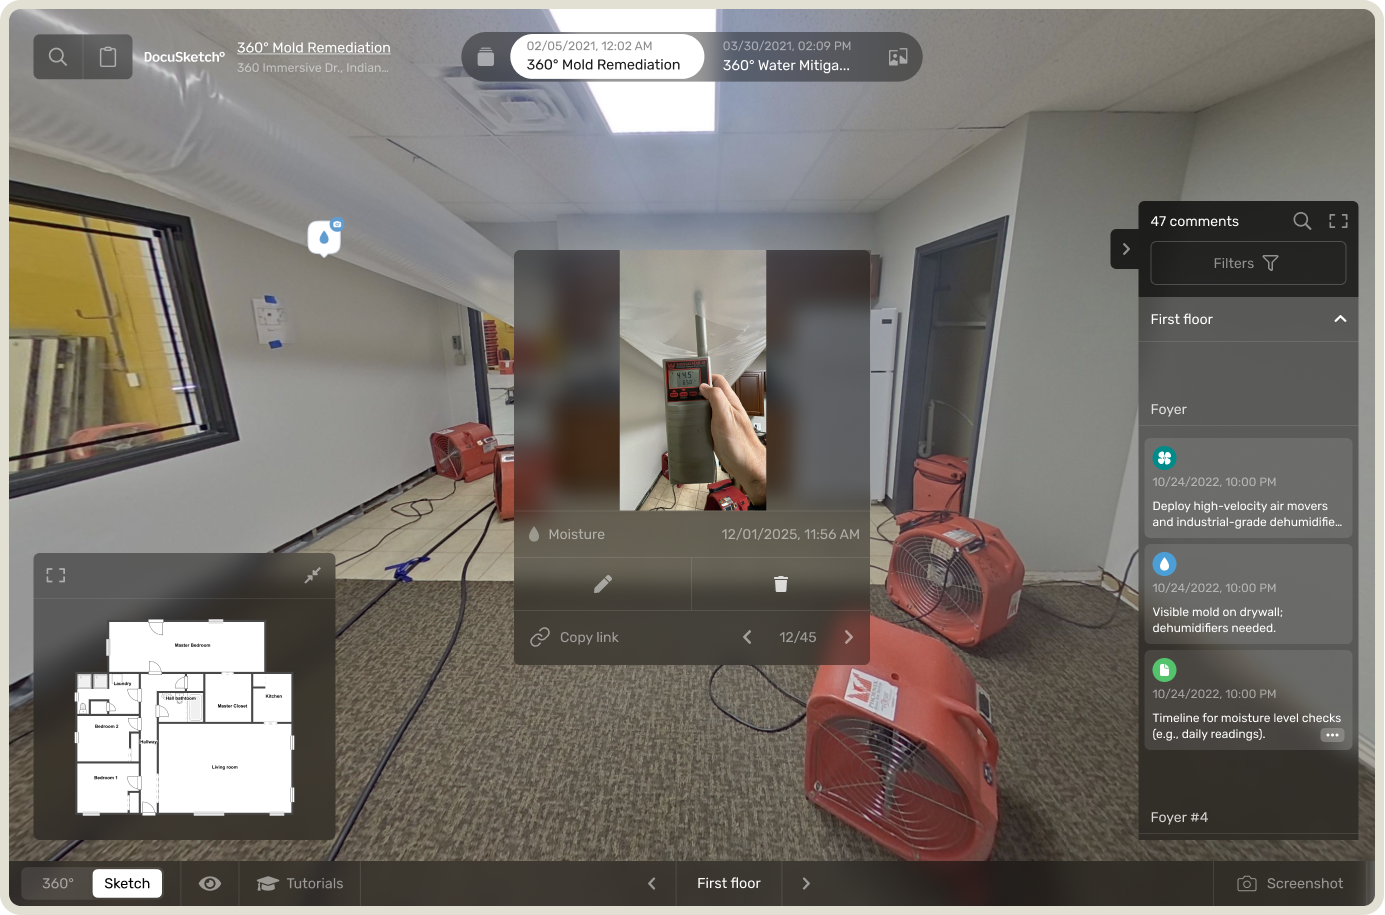
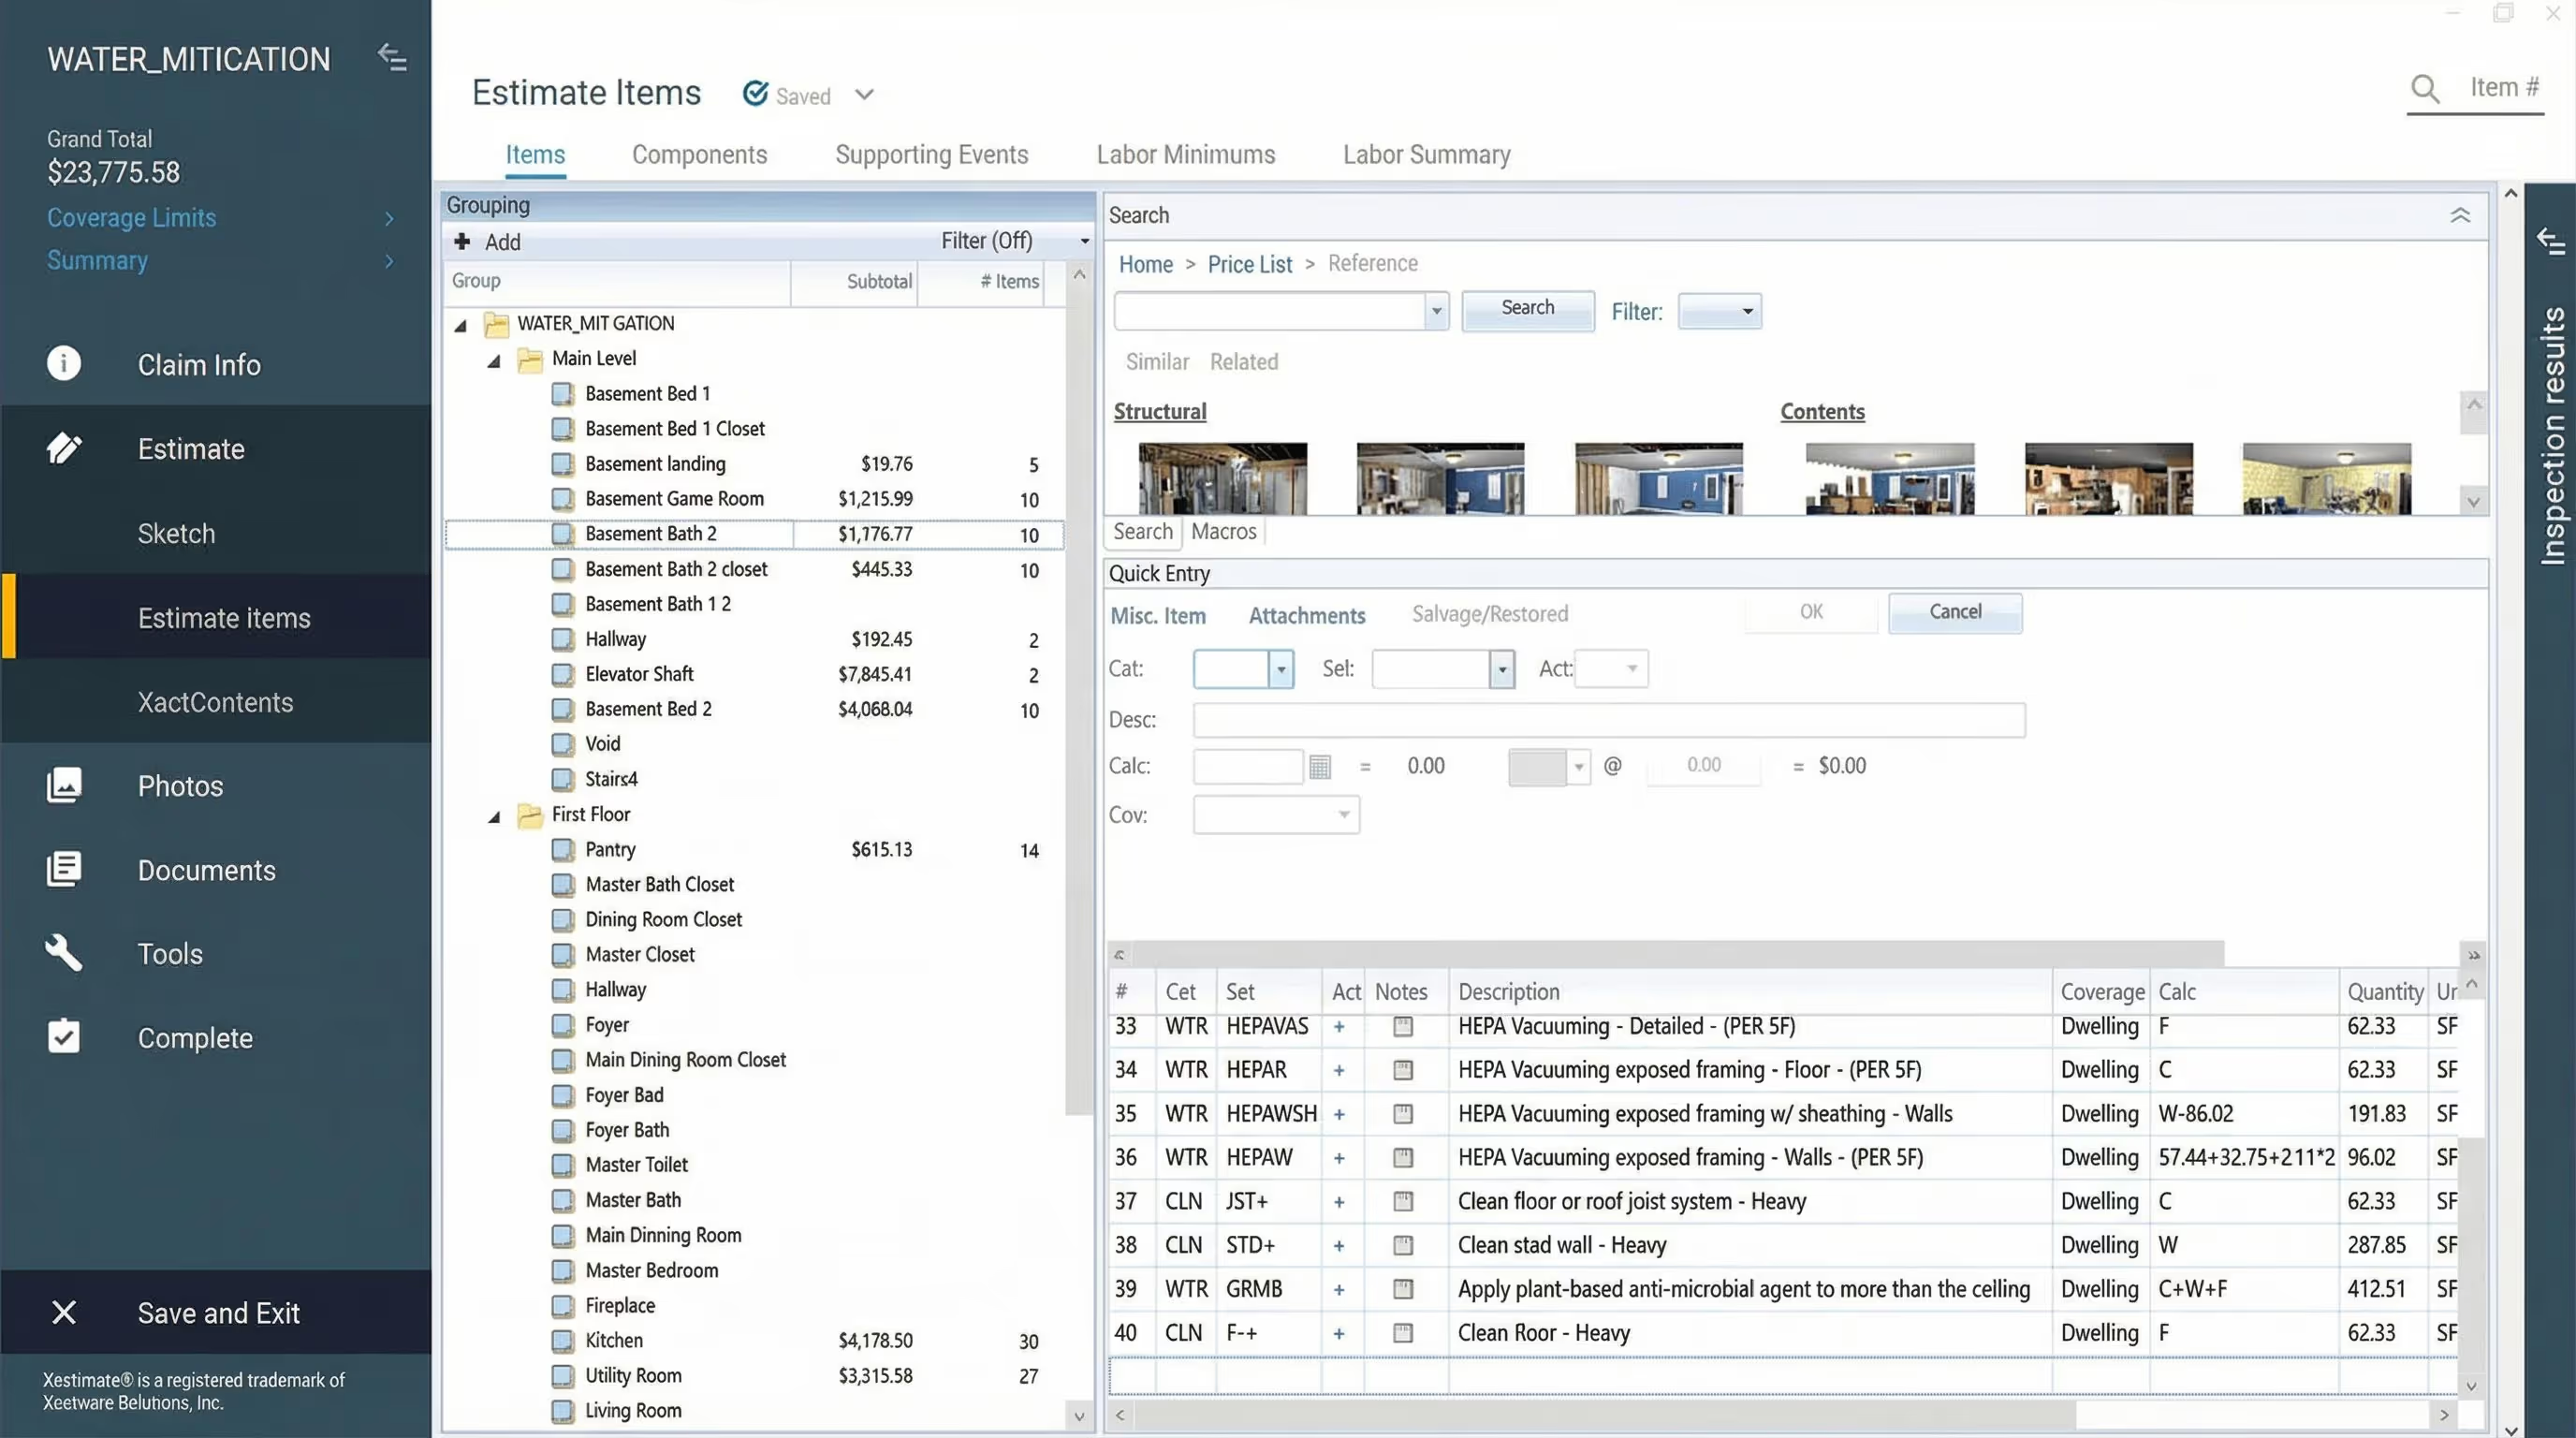
Xactimate Sketch is the built-in tool in Xactimate that lets you create precise, scaled floorplans of rooms or entire properties. Contractors and insurance adjusters use these sketches to better estimate the repair costs on a restoration job.
Why Is It So Important?
Chris Tilkov says it best: “Xactimate utilizes that sketch for the estimate line items, including variables like walls, floors, and ceilings to dictate the square footage. Those calculations have to be accurate if you want to prepare a great estimate.”
So it's no surprise that a good Xactimate Sketch is an accurate Xactimate Sketch. If your sketch is off, every line item that depends on it will be too. It’s critical to understand how to use each of Xactimate’s many features correctly as you build to achieve this accuracy the first time.
“Accuracy is super important for this entire process,” says Muto. “If you start with a bad sketch, the rest of the estimate will fail based on that. If the measurements are off, you’ll end up with the wrong quantities. There’s a real dollar value associated with that.”
Navigating the Sketch Interface
Before you sketch a room in Xactimate, it's important to get familiar with the Sketch interface. When you open it, you’ll see a blank canvas and a toolbar at the top. This toolbar is your control center for everything; from placing rooms to adding details like windows, doors, and fixtures.
Here’s a quick overview of what each section of the toolbar does:
1. Drawing Tools (Far Left)
This is where you start your sketch.
- Use tools to draw rooms, roofs, staircases, and more
- Add structural elements like walls, windows, doorways, or missing walls
Use the Room Tool (or press “R”) to begin sketching most floorplans.
(More on this method in the next section)
2. Object Controls (Center Section)
Use these tools to precisely edit and align what you’ve drawn.
- Flip elements horizontally or vertically
- Rotate rooms or shapes
- Adjust the orientation of ceilings and roofs
This section is essential for accurately mirroring real-world layouts, especially in multi-room or multi-floor structures.
3. Free Draw & Reference Tools (Right Side)
These are for advanced sketch elements:
- Use Free Draw blocks to represent non-structural features (like cabinets or fireplaces)
- Add reference points, lines, or areas for accuracy and visual guidance
- Place symbols for plumbing fixtures, furniture, and appliances using the Symbols Tool
These help you fine-tune your room and create a clear, functional sketch that aligns with both construction and insurance documentation needs.
Now that you’re familiar with the interface, it’s time to start drawing. In the next section, we’ll walk you through exactly how to sketch a room in Xactimate using the recommended method. Let’s get started with the Room Tool.
Method 1: Using the Room Tool to Sketch a Room
The Room Tool is the recommended way to start a sketch. It's designed to help you quickly place and accurately size rooms with minimal effort. Whether you're sketching a single room or building an entire floorplan, this tool keeps your measurements consistent and reduces errors.
“Users are encouraged to use the Room Tool, and then use Breaks and Vertex for more complex shapes within the room. You should never start a room using the Wall Tool,” says Muto.
Here’s how you get started with the Room tool:
A Step-by-Step Guide to Using the Room Tool
1. Activate the Room Tool
Click the Room Tool from the toolbar (far left) or press R on your keyboard. This places a sample room on your cursor.
2. Place the room on your sketch
Click anywhere on the canvas to drop the room.
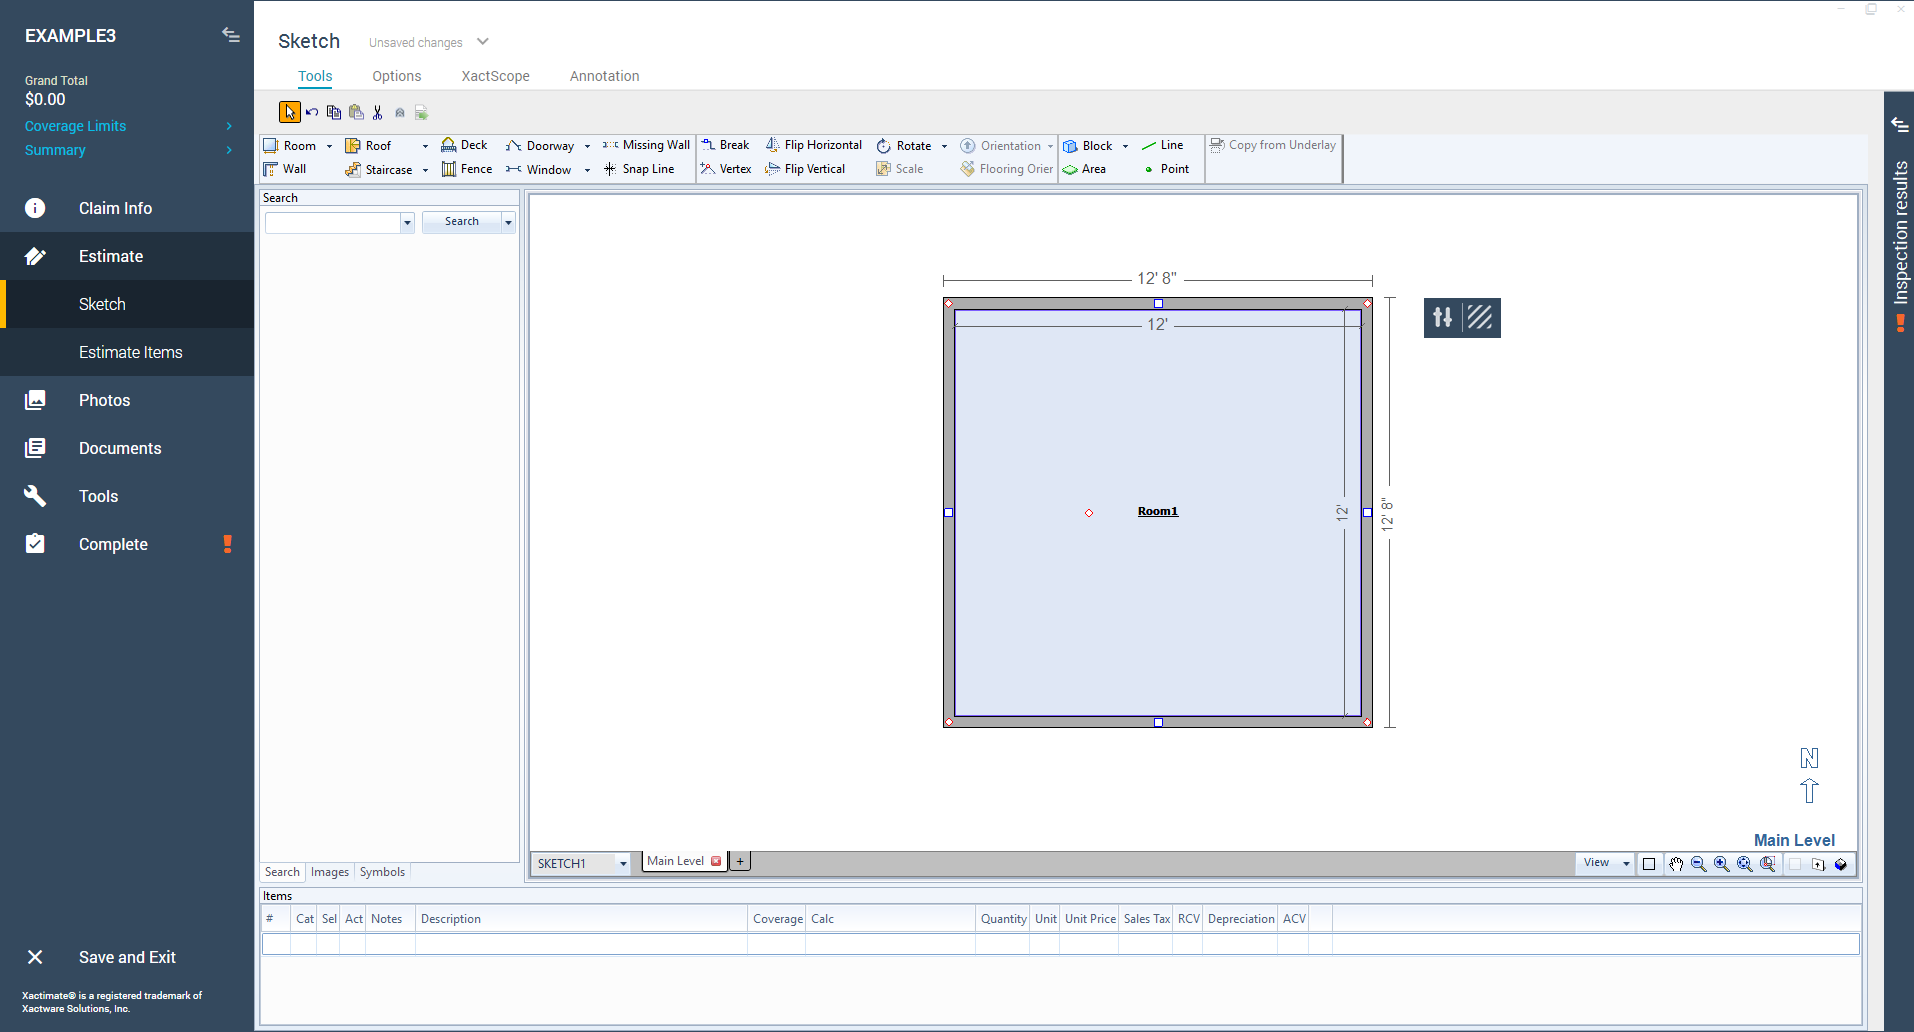
3. Enter exact room dimensions
If the room is a simple square or rectangle, click the blue measurement boxes to manually enter the correct wall lengths.
- Use a comma to separate feet and inches (e.g., 12,4 for 12 feet 4 inches) - Xactimate will convert it for you.
- This method is far more accurate than dragging wall edges with your mouse.
⚠️ Avoid dragging to size rooms unless necessary - it can create fractional inaccuracies.
“If I have a 9’6” room, rather than dragging it out to those dimensions, I’ll just type it in,” says Tilkov. “Dragging can create fractional amounts that throw off the sketch.”

4. Sketch irregular room shapes (if needed)
If the room has a non-standard shape, use the Break or Vertex tools to modify the layout. These let you split walls or add angles to match the real structure.

5. Add structural features like doors and windows
Use the toolbar or keyboard shortcuts to insert elements such as:
- Doors (shortcut: D)
- Windows (W)
- Missing walls, openings, or other features
Click the relevant tool, hover over the wall, and left-click to place the item. Then use the Properties panel to adjust dimensions, behavior, and placement as needed.
“Once you have the room sized correctly, you can start to add construction properties within the room, like ceiling height, door openings, any missing walls, or window openings,” says Tilkov. “I recommend keeping a list of shortcuts handy, since that makes it a lot easier and faster to go through the sketch than clicking the toolbar each time.”

6. Label the room and adjust properties
Double-click the room name to edit it. Then, in the Properties panel, confirm:
- Room name
- Ceiling height and type
- Wall thickness or material (if needed)
This ensures your sketch is accurate not just visually, but also in the data behind it.

7. Save your work
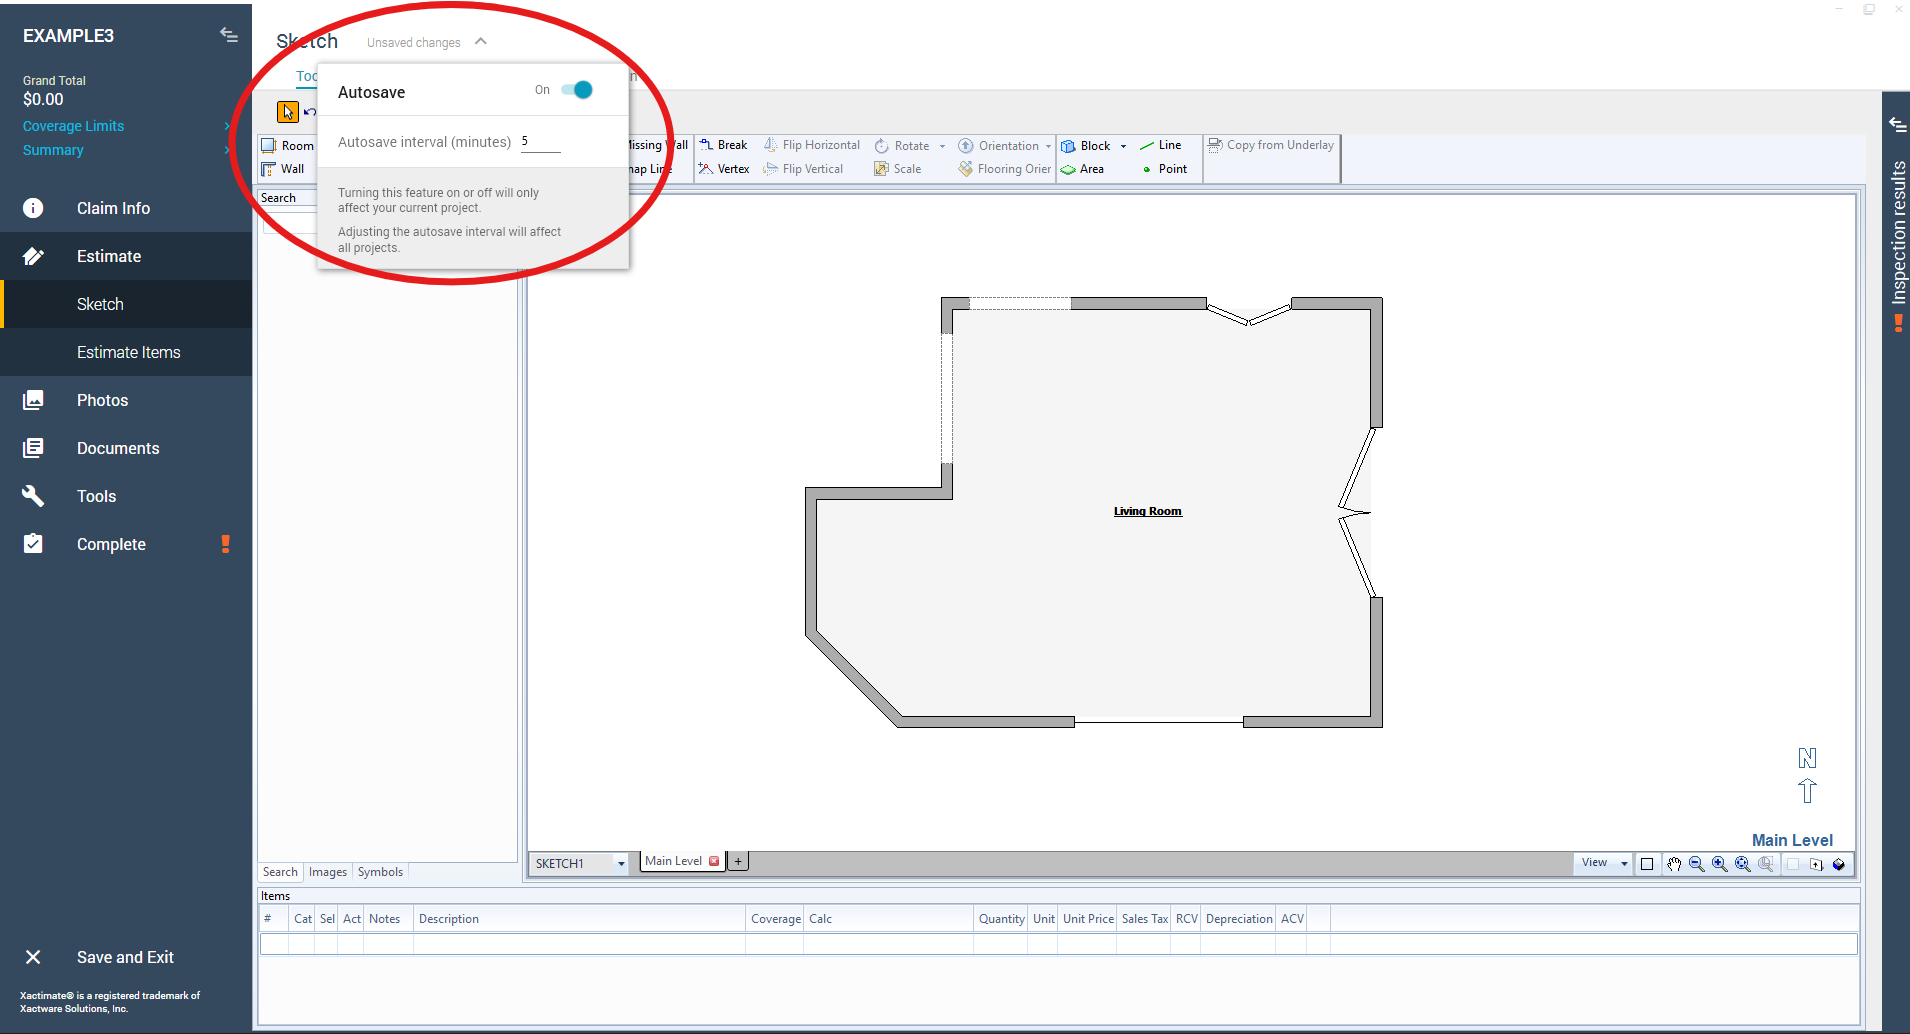
Xactimate autosaves every five minutes, but it’s good practice to check manually.
- Look for the “Unsaved changes” indicator at the top of the screen
- Click it to force a save if you’ve made major updates
This helps you avoid losing any changes, especially after adjusting room structure or adding detailed elements.
This is the simplest way to create a Room using Sketch. Of course, few restoration projects are that simple.
Method 2: CTRL + Click, Hold and Drag to Create Rooms
One way to speed up the process of building an entire floorplan is to use CTRL+ Click, Hold and Drag to “pull” new rooms as you go. Once you’ve created one room, you can easily pull new rooms off of one side of an existing room, adjust the measurements, and add room elements as needed.

When to Use Copy/Paste for Duplication Technique
It’s best to use this method when sketching similar rooms—like a cookie-cutter high-rise where apartments on the left have one layout and the apartments on the right have another. Rather than draw each one of these out, you can duplicate it as you add floors.

“It’s usually quicker to drop a new room, but when you have apartment buildings or other properties with repeating structures, where Unit 101 and 201 are identical, you can start with your first room and work off of that,” says Muto.
Step-by-Step Instructions to Create Additional Rooms
Creating a new room takes just a few steps:
- Select the existing room that you wish to create a new room off of.
- Hold CTRL and drag from the handle to add a room adjacent
- Confirm the dimensions are correct, or modify if needed, by clicking on the blue measurement boxes and typing the correct numbers and/or adding breaks/vertices where needed.
- Just as you would with any new room, go to the “Properties” tab and edit any relevant information, like wall thickness or ceiling height.
- Change or add room elements like doors, windows, and reference blocks for appliances or cabinets using the tools in the toolbar or relevant shortcuts.
- Once the room is completed, you can start on to the next room.
- When you’re finished, make sure your work is saved. The default auto-save in Xactimate is every five minutes, this will ensure you never lose a significant amount of work. If you’re not sure, click “Unsaved changes” at the top of the page.
You can also duplicate a room using copy/paste rather than “pulling” a new room with CTRL+ Click. If you choose this method, then duplicating a room means all of the room properties will be copied over, so make sure to edit any necessary items like wall thickness, ceiling heights, floor or ceiling type, and the room name or grouping.
Method 3: Sketching a Room Using the Wall Tool
Another common method for sketching a room is using the Wall Tool, or Shift+W. However, that might not be your best approach. As tempting as it is to drag and drop four walls together, it’s best to use the Room Tool first.
When to Use the Wall Tool
“If you sketch a room out of walls instead of the Room Tool, it can cause some issues,” says Tilkov. “It seems easier because you don’t have to fuss with all of the breaks or vertices, but you can see how tricky it is to get the walls to connect in the right place, and so it’s much more finicky.”
Can you use the Wall Tool? Of course. But both Tilkov and Muto did not recommend it, except to add partial walls within an existing floorplan.
Step-by-Step Guide to Using the Wall Tool
While you can use the Wall Tool to create a room from scratch, instead, think of it as a way to edit a larger floorplan.

- Choose the Wall Tool from the top toolbar, or press “Shift+W” as a shortcut. This activates the wall tool.
- Hover over where you want to create a wall. Then, left- click and drag until the wall appears as you’d like.
- Adjust the dimensions by selecting the measurement boxes and typing in the correct numbers.
- Though our experts don’t recommend it because it can introduce minor inaccuracies, you can add a connecting wall by clicking the endpoint of an existing wall, then click and drag each wall to create the room. If you choose this method, make sure that each wall is connected and closed and that the measurements are correct before moving forward.
- From there, you can add other room elements like doors, windows, and reference blocks for appliances or cabinets using the tools in the toolbar or relevant shortcuts.
- When you’re finished, make sure your work is saved. The default auto-save in Xactimate is every five minutes, this will ensure you never lose a significant amount of work. If you’re not sure, click “Unsaved changes” at the top of the page.
Note that this is different from the Missing Wall tool, which allows you to sketch an opening in a wall. This can represent partial walls, service windows, large doorways, or other aspects of a more open floorplan.
Tips for Accuracy and Efficiency in Xactimate Sketch
Once you start playing around in Xactimate Sketch, you can see how flexible the tool can be. You can sketch a room several different ways; what matters more is the general knowledge behind the sketch. Know the goal behind the sketch before you begin.
Says Tilkov, “Have the scope of work ahead of time if you can, before you sketch. If you know that the flooring needs to be replaced, you can focus on those details. For example, if you know that a continuous area, like a living area and hallway, that’s a more important element to delineate than just the rooms themselves.”
This gets complicated, but the more you can accurately represent the room you’re sketching with an eye to what work you need to complete, the easier it will be for all of the project stakeholders—the owners, to visualize what’s happening; the contractors, to have an accurate plan; and the insurance adjuster, who can make sure the cost matches the work.
That’s why…
1. Measurements are Everything
Whether a sketch is useful or not comes down to the measurements. “The biggest thing to make sure your sketch works is that all the information is up to date,” says Muto. “Whether you use DocuSketch’s cameras or go out to the job site and tape measure everything yourself, you have to have accurate measurements. Once you have those measurements, you’re good to go.”
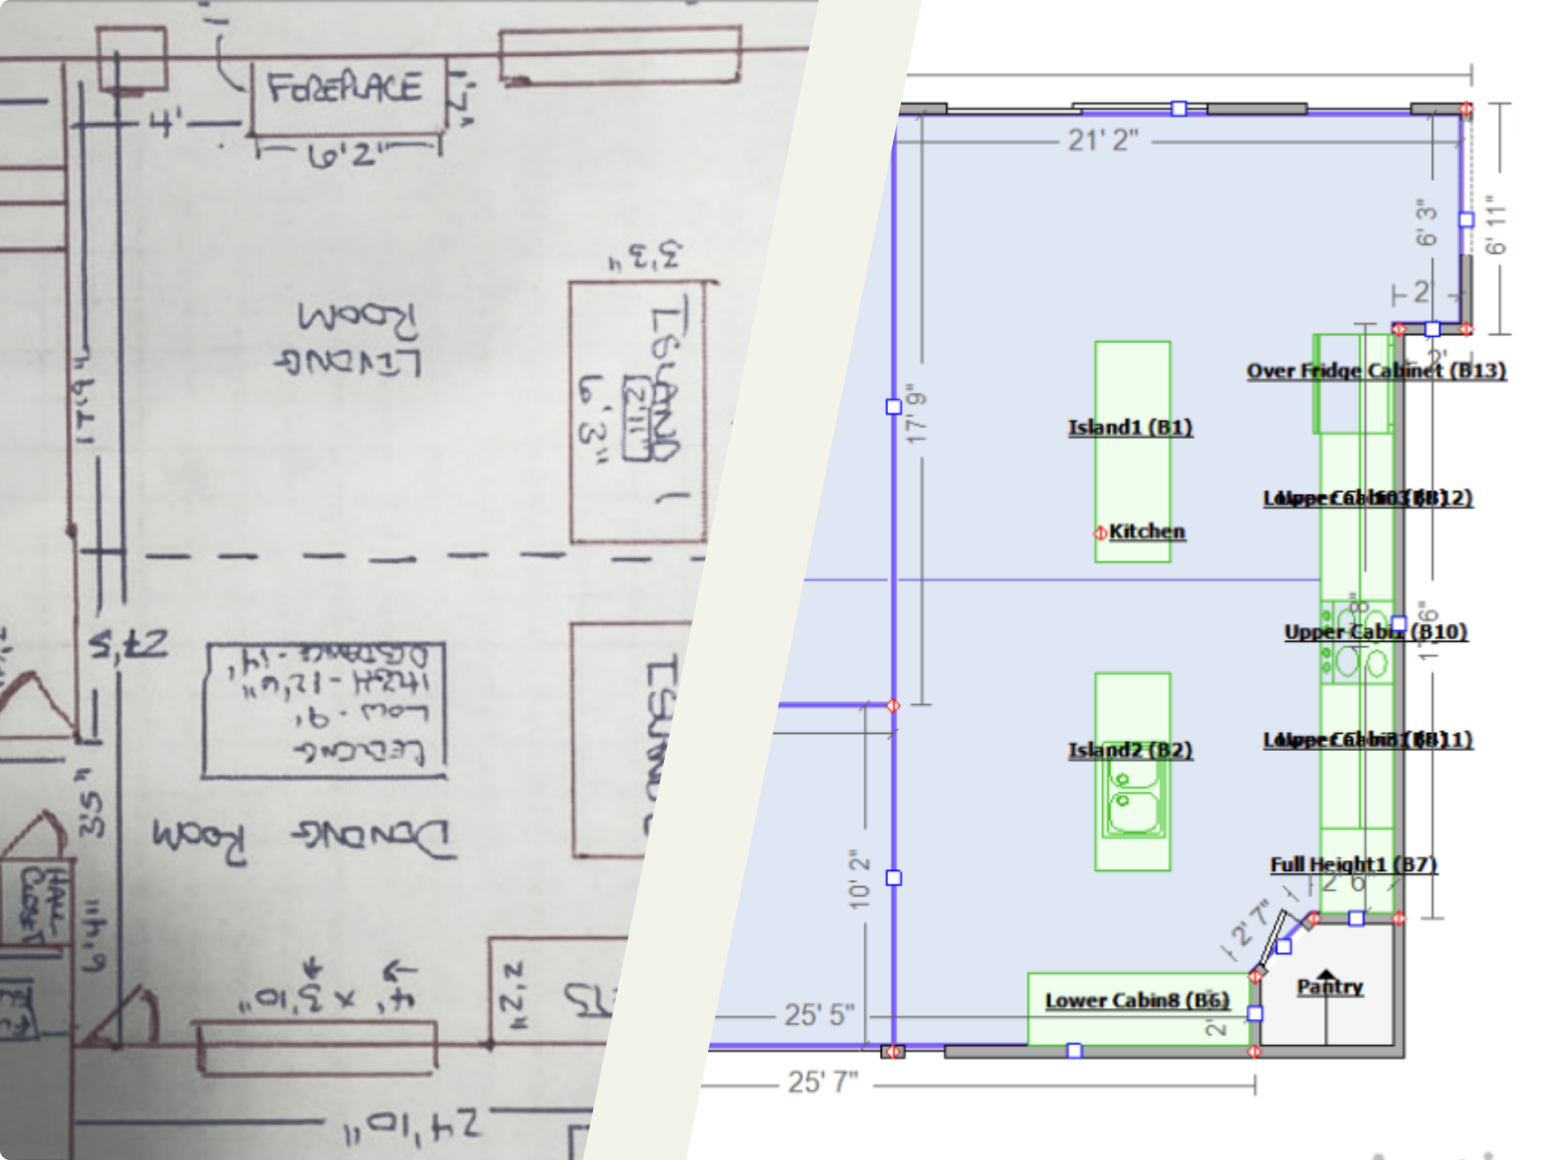
Solid measurements give you the foundation to do more with your sketch. But it also can expedite the process if you use the Underlay Tool (the fourth and final section) to import a floor plan image from real estate sales, engineering blueprints, or DocuSketch to move more quickly building rooms.

To use the Underlay Tool to build your room:
- In the top toolbar, go to Options > Import > Import Underlay Image
- Upload or select the floor plan image you want to use as your underlay.
- Give Xactimate a scale for measurements by adding or editing at least one wall with the correct dimensions. Always use the longest distance available for the best accuracy.
- Then, you can start sketching, using the Room Tool.
- Trace over all of the relevant room elements, like doors, windows, or other room properties like missing walls.
- Once the room is completed, you can start on to the next room. When you’re finished, make sure your work is saved. The default auto-save in Xactimate is every five minutes, this will ensure you never lose a significant amount of work. If you’re not sure, click “Unsaved changes” at the top of the page.
2. Use Shortcuts to Move Faster
As you get more comfortable in Sketch, you can move faster if you use shortcuts. See a full list of Xactimate shortcuts here.
“Any decent estimator over time knows the shortcuts. I can enter five rooms in ten seconds and then adjust the measurements quickly to make a floorplan. The toolbar is great for new users, but the sooner you get comfortable with shortcuts, the better off you’ll be,” says Muto.
3. Check Your Room Properties in 3D
Before you finish a room, click the Properties icon to set the other important aspects of a room, like ceiling height, and wall thickness. Forgetting this step can miss on-the-ground elements of doing repair or restoration work—for example, a third-floor room with a pitched ceiling feels completely different than a family room with vaulted ceilings or exposed beams.

Once you’ve set your room properties, you can also double check your work by going to the bottom right corner and selecting the 3D View button. That will show you immediately if you’ve created a room that looks accurate, or if you’ve accidentally copied over the wrong type of ceiling or roof properties when using the duplication method.

This includes all of your room properties, including doors, windows, and reference blocks. “With any interior sketch, you’ll want to add reference blocks or symbols for any large object, like showers, cabinets, or appliances,” says Tilkov. “Reference blocks have behavior properties that allow you to make changes, like deducting the linear or square footage of the floor behind. That way when you’re looking at the work to be done, like tiling a bathroom floor, you already know how big the shower or bathtub is in the space.”
DocuSketch Helps You Skip a Step
DocuSketch turns the estimating process into a seamless engagement that takes less than 48 hours.
- Instead of measuring every wall by hand and building the sketch yourself, capturing a standard apartment with DocuSketch often takes just 20 minutes.
- From there, simply submit your walkthrough and let our team handle the rest. We’ll deliver an accurate Xactimate Sketch, typically within two business days.
“DocuSketch makes this entire process significantly easier,” says Muto. “Once our team gets the floor plan, they can prepare the .esx file so all you have to worry about is sending it to the insurance adjuster or to the contractor, depending on where you are in the process.”
Sketch your next room faster with DocuSketch >
Once you’ve scoped the project and aligned with the property owner, the next critical step is sketching the room in Xactimate accurately. A good sketch is the foundation of a great estimate.
But getting that information into Xactimate can feel overwhelming, especially if you’re not yet comfortable with the platform’s many tools and shortcuts. You may find yourself double- or triple-checking measurements, and that’s for a good reason: precision is everything when preparing an estimate.
Xactimate is a powerful but complex tool = so complex, it might as well come with its own graduate degree. That’s why I asked two of our in-house experts, Chris Tilkov and Christopher Muto, to walk you through exactly how to sketch a room the right way. (Disclaimer: You do not have to be named Chris to become an expert in this tool.)
What Is “Xactimate Sketch” and Why is it Important?
Xactimate Sketch is the built-in tool in Xactimate that lets you create precise, scaled floorplans of rooms or entire properties. Contractors and insurance adjusters use these sketches to better estimate the repair costs on a restoration job.
Why Is It So Important?
Chris Tilkov says it best: “Xactimate utilizes that sketch for the estimate line items, including variables like walls, floors, and ceilings to dictate the square footage. Those calculations have to be accurate if you want to prepare a great estimate.”
So it's no surprise that a good Xactimate Sketch is an accurate Xactimate Sketch. If your sketch is off, every line item that depends on it will be too. It’s critical to understand how to use each of Xactimate’s many features correctly as you build to achieve this accuracy the first time.
“Accuracy is super important for this entire process,” says Muto. “If you start with a bad sketch, the rest of the estimate will fail based on that. If the measurements are off, you’ll end up with the wrong quantities. There’s a real dollar value associated with that.”
Navigating the Sketch Interface
Before you sketch a room in Xactimate, it's important to get familiar with the Sketch interface. When you open it, you’ll see a blank canvas and a toolbar at the top. This toolbar is your control center for everything; from placing rooms to adding details like windows, doors, and fixtures.
Here’s a quick overview of what each section of the toolbar does:
1. Drawing Tools (Far Left)
This is where you start your sketch.
- Use tools to draw rooms, roofs, staircases, and more
- Add structural elements like walls, windows, doorways, or missing walls
Use the Room Tool (or press “R”) to begin sketching most floorplans.
(More on this method in the next section)
2. Object Controls (Center Section)
Use these tools to precisely edit and align what you’ve drawn.
- Flip elements horizontally or vertically
- Rotate rooms or shapes
- Adjust the orientation of ceilings and roofs
This section is essential for accurately mirroring real-world layouts, especially in multi-room or multi-floor structures.
3. Free Draw & Reference Tools (Right Side)
These are for advanced sketch elements:
- Use Free Draw blocks to represent non-structural features (like cabinets or fireplaces)
- Add reference points, lines, or areas for accuracy and visual guidance
- Place symbols for plumbing fixtures, furniture, and appliances using the Symbols Tool
These help you fine-tune your room and create a clear, functional sketch that aligns with both construction and insurance documentation needs.
Now that you’re familiar with the interface, it’s time to start drawing. In the next section, we’ll walk you through exactly how to sketch a room in Xactimate using the recommended method. Let’s get started with the Room Tool.
Method 1: Using the Room Tool to Sketch a Room
The Room Tool is the recommended way to start a sketch. It's designed to help you quickly place and accurately size rooms with minimal effort. Whether you're sketching a single room or building an entire floorplan, this tool keeps your measurements consistent and reduces errors.
“Users are encouraged to use the Room Tool, and then use Breaks and Vertex for more complex shapes within the room. You should never start a room using the Wall Tool,” says Muto.
Here’s how you get started with the Room tool:
A Step-by-Step Guide to Using the Room Tool
1. Activate the Room Tool
Click the Room Tool from the toolbar (far left) or press R on your keyboard. This places a sample room on your cursor.
2. Place the room on your sketch
Click anywhere on the canvas to drop the room.
3. Enter exact room dimensions
If the room is a simple square or rectangle, click the blue measurement boxes to manually enter the correct wall lengths.
- Use a comma to separate feet and inches (e.g., 12,4 for 12 feet 4 inches) - Xactimate will convert it for you.
- This method is far more accurate than dragging wall edges with your mouse.
⚠️ Avoid dragging to size rooms unless necessary - it can create fractional inaccuracies.
“If I have a 9’6” room, rather than dragging it out to those dimensions, I’ll just type it in,” says Tilkov. “Dragging can create fractional amounts that throw off the sketch.”
4. Sketch irregular room shapes (if needed)
If the room has a non-standard shape, use the Break or Vertex tools to modify the layout. These let you split walls or add angles to match the real structure.
5. Add structural features like doors and windows
Use the toolbar or keyboard shortcuts to insert elements such as:
- Doors (shortcut: D)
- Windows (W)
- Missing walls, openings, or other features
Click the relevant tool, hover over the wall, and left-click to place the item. Then use the Properties panel to adjust dimensions, behavior, and placement as needed.
“Once you have the room sized correctly, you can start to add construction properties within the room, like ceiling height, door openings, any missing walls, or window openings,” says Tilkov. “I recommend keeping a list of shortcuts handy, since that makes it a lot easier and faster to go through the sketch than clicking the toolbar each time.”
6. Label the room and adjust properties
Double-click the room name to edit it. Then, in the Properties panel, confirm:
- Room name
- Ceiling height and type
- Wall thickness or material (if needed)
This ensures your sketch is accurate not just visually, but also in the data behind it.
7. Save your work
Xactimate autosaves every five minutes, but it’s good practice to check manually.
- Look for the “Unsaved changes” indicator at the top of the screen
- Click it to force a save if you’ve made major updates
This helps you avoid losing any changes, especially after adjusting room structure or adding detailed elements.
This is the simplest way to create a Room using Sketch. Of course, few restoration projects are that simple.
Method 2: CTRL + Click, Hold and Drag to Create Rooms
One way to speed up the process of building an entire floorplan is to use CTRL+ Click, Hold and Drag to “pull” new rooms as you go. Once you’ve created one room, you can easily pull new rooms off of one side of an existing room, adjust the measurements, and add room elements as needed.
When to Use Copy/Paste for Duplication Technique
It’s best to use this method when sketching similar rooms—like a cookie-cutter high-rise where apartments on the left have one layout and the apartments on the right have another. Rather than draw each one of these out, you can duplicate it as you add floors.
“It’s usually quicker to drop a new room, but when you have apartment buildings or other properties with repeating structures, where Unit 101 and 201 are identical, you can start with your first room and work off of that,” says Muto.
Step-by-Step Instructions to Create Additional Rooms
Creating a new room takes just a few steps:
- Select the existing room that you wish to create a new room off of.
- Hold CTRL and drag from the handle to add a room adjacent
- Confirm the dimensions are correct, or modify if needed, by clicking on the blue measurement boxes and typing the correct numbers and/or adding breaks/vertices where needed.
- Just as you would with any new room, go to the “Properties” tab and edit any relevant information, like wall thickness or ceiling height.
- Change or add room elements like doors, windows, and reference blocks for appliances or cabinets using the tools in the toolbar or relevant shortcuts.
- Once the room is completed, you can start on to the next room.
- When you’re finished, make sure your work is saved. The default auto-save in Xactimate is every five minutes, this will ensure you never lose a significant amount of work. If you’re not sure, click “Unsaved changes” at the top of the page.
You can also duplicate a room using copy/paste rather than “pulling” a new room with CTRL+ Click. If you choose this method, then duplicating a room means all of the room properties will be copied over, so make sure to edit any necessary items like wall thickness, ceiling heights, floor or ceiling type, and the room name or grouping.
Method 3: Sketching a Room Using the Wall Tool
Another common method for sketching a room is using the Wall Tool, or Shift+W. However, that might not be your best approach. As tempting as it is to drag and drop four walls together, it’s best to use the Room Tool first.
When to Use the Wall Tool
“If you sketch a room out of walls instead of the Room Tool, it can cause some issues,” says Tilkov. “It seems easier because you don’t have to fuss with all of the breaks or vertices, but you can see how tricky it is to get the walls to connect in the right place, and so it’s much more finicky.”
Can you use the Wall Tool? Of course. But both Tilkov and Muto did not recommend it, except to add partial walls within an existing floorplan.
Step-by-Step Guide to Using the Wall Tool
While you can use the Wall Tool to create a room from scratch, instead, think of it as a way to edit a larger floorplan.
- Choose the Wall Tool from the top toolbar, or press “Shift+W” as a shortcut. This activates the wall tool.
- Hover over where you want to create a wall. Then, left- click and drag until the wall appears as you’d like.
- Adjust the dimensions by selecting the measurement boxes and typing in the correct numbers.
- Though our experts don’t recommend it because it can introduce minor inaccuracies, you can add a connecting wall by clicking the endpoint of an existing wall, then click and drag each wall to create the room. If you choose this method, make sure that each wall is connected and closed and that the measurements are correct before moving forward.
- From there, you can add other room elements like doors, windows, and reference blocks for appliances or cabinets using the tools in the toolbar or relevant shortcuts.
- When you’re finished, make sure your work is saved. The default auto-save in Xactimate is every five minutes, this will ensure you never lose a significant amount of work. If you’re not sure, click “Unsaved changes” at the top of the page.
Note that this is different from the Missing Wall tool, which allows you to sketch an opening in a wall. This can represent partial walls, service windows, large doorways, or other aspects of a more open floorplan.
Tips for Accuracy and Efficiency in Xactimate Sketch
Once you start playing around in Xactimate Sketch, you can see how flexible the tool can be. You can sketch a room several different ways; what matters more is the general knowledge behind the sketch. Know the goal behind the sketch before you begin.
Says Tilkov, “Have the scope of work ahead of time if you can, before you sketch. If you know that the flooring needs to be replaced, you can focus on those details. For example, if you know that a continuous area, like a living area and hallway, that’s a more important element to delineate than just the rooms themselves.”
This gets complicated, but the more you can accurately represent the room you’re sketching with an eye to what work you need to complete, the easier it will be for all of the project stakeholders—the owners, to visualize what’s happening; the contractors, to have an accurate plan; and the insurance adjuster, who can make sure the cost matches the work.
That’s why…
1. Measurements are Everything
Whether a sketch is useful or not comes down to the measurements. “The biggest thing to make sure your sketch works is that all the information is up to date,” says Muto. “Whether you use DocuSketch’s cameras or go out to the job site and tape measure everything yourself, you have to have accurate measurements. Once you have those measurements, you’re good to go.”
Solid measurements give you the foundation to do more with your sketch. But it also can expedite the process if you use the Underlay Tool (the fourth and final section) to import a floor plan image from real estate sales, engineering blueprints, or DocuSketch to move more quickly building rooms.
To use the Underlay Tool to build your room:
- In the top toolbar, go to Options > Import > Import Underlay Image
- Upload or select the floor plan image you want to use as your underlay.
- Give Xactimate a scale for measurements by adding or editing at least one wall with the correct dimensions. Always use the longest distance available for the best accuracy.
- Then, you can start sketching, using the Room Tool.
- Trace over all of the relevant room elements, like doors, windows, or other room properties like missing walls.
- Once the room is completed, you can start on to the next room. When you’re finished, make sure your work is saved. The default auto-save in Xactimate is every five minutes, this will ensure you never lose a significant amount of work. If you’re not sure, click “Unsaved changes” at the top of the page.
2. Use Shortcuts to Move Faster
As you get more comfortable in Sketch, you can move faster if you use shortcuts. See a full list of Xactimate shortcuts here.
“Any decent estimator over time knows the shortcuts. I can enter five rooms in ten seconds and then adjust the measurements quickly to make a floorplan. The toolbar is great for new users, but the sooner you get comfortable with shortcuts, the better off you’ll be,” says Muto.
3. Check Your Room Properties in 3D
Before you finish a room, click the Properties icon to set the other important aspects of a room, like ceiling height, and wall thickness. Forgetting this step can miss on-the-ground elements of doing repair or restoration work—for example, a third-floor room with a pitched ceiling feels completely different than a family room with vaulted ceilings or exposed beams.
Once you’ve set your room properties, you can also double check your work by going to the bottom right corner and selecting the 3D View button. That will show you immediately if you’ve created a room that looks accurate, or if you’ve accidentally copied over the wrong type of ceiling or roof properties when using the duplication method.
This includes all of your room properties, including doors, windows, and reference blocks. “With any interior sketch, you’ll want to add reference blocks or symbols for any large object, like showers, cabinets, or appliances,” says Tilkov. “Reference blocks have behavior properties that allow you to make changes, like deducting the linear or square footage of the floor behind. That way when you’re looking at the work to be done, like tiling a bathroom floor, you already know how big the shower or bathtub is in the space.”
DocuSketch Helps You Skip a Step
DocuSketch turns the estimating process into a seamless engagement that takes less than 48 hours.
- Instead of measuring every wall by hand and building the sketch yourself, capturing a standard apartment with DocuSketch often takes just 20 minutes.
- From there, simply submit your walkthrough and let our team handle the rest. We’ll deliver an accurate Xactimate Sketch, typically within two business days.
“DocuSketch makes this entire process significantly easier,” says Muto. “Once our team gets the floor plan, they can prepare the .esx file so all you have to worry about is sending it to the insurance adjuster or to the contractor, depending on where you are in the process.”
Sketch your next room faster with DocuSketch >

Related Articles


%20(1).jpg)