How to Set & Maximize Profit Margins in Restoration


5 min read
Profit margins are the lifeline of every restoration company. They tell you if the work you’re doing is actually building a healthy business or just keeping the lights on. The challenge is that too many owners confuse markup with margin. It may seem like a minor detail, but this misunderstanding can lead to undercharging, weaker profits, and difficulty covering overhead.
I’ll explain how to set margins properly and walk through three practical ways to structure them. You’ll also see how streamlining your documentation and estimating process can protect margins and free your team to focus on the work instead of rework. Setting margins correctly is one of the most important ways to grow your restoration business.
Understanding Markup vs. Margin: Why It Matters More Than You Think
Definitions and Differences
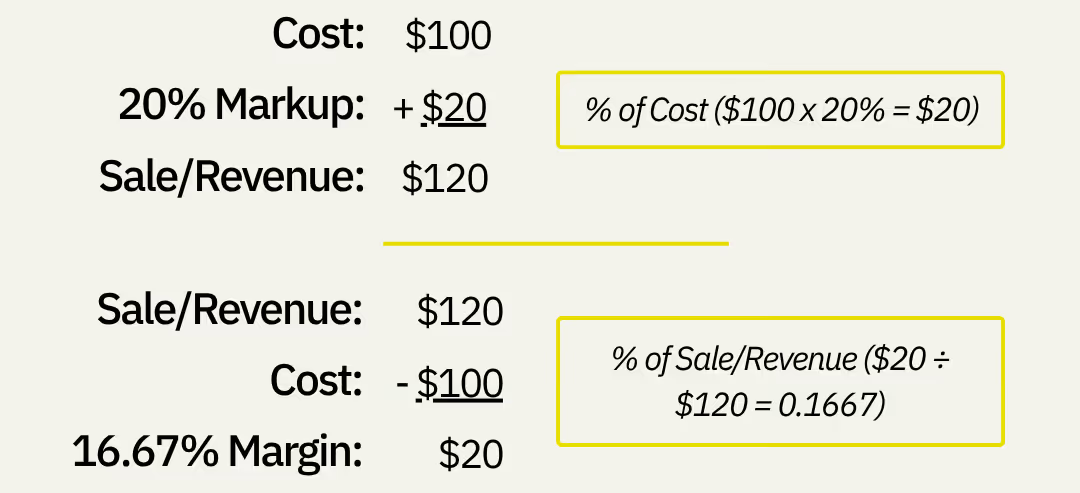
Markup is based on cost. Margin is based on the revenue/sales price.
Here’s a simple example:
Cost of goods = $100.
Add a 10% markup to reach your sale price = $110.
Profit = Sale Price - Cost of Goods. In this case, profit = $9.00
Margin = Profit ÷ Sale Price. In this case, margin = 9%.
So, while your markup is 10%, your margin is only 9%. That 1% difference may not seem like much, but across hundreds of jobs, it adds up quickly.
Still unclear? Take a look at my recent LinkedIn post, where I break it down with a short video explainer that brings the numbers to life.
Why This Misunderstanding Hurts Restoration Business Owners
When restoration businesses use markup to set prices, they often miss their true margin target. The result is slimmer profits and a constant struggle to stay ahead of rising costs.
How to Set Profit Margins in Your Restoration Business
Start With Cost Clarity
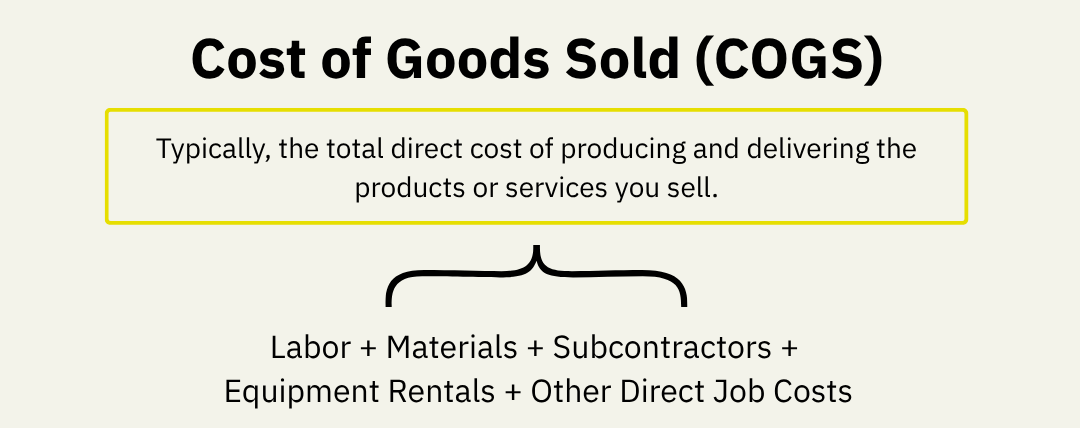
You can’t set a healthy margin until you know your true costs. That includes labor and benefits, materials and equipment, administrative expenses, and overhead like rent, utilities, and software. Add those up to find your break-even point. From there, you can decide how much you need to charge to stay profitable.
Define Your Target Margin
There’s no one-size-fits-all margin. Smaller companies that operate from a garage may run lean, while established firms with full-time staff and office space carry more overhead. Most healthy restoration businesses aim for margins that allow them to reinvest in growth and absorb unexpected costs. The important thing is to know your numbers instead of copying what “everyone else” does.
Choose a Margin Strategy
Once you know your costs and target, you can choose a strategy for applying margin. Some businesses prefer to build it into labor rates. Others apply it at the end of an estimate. Some use time and materials. The method matters less than making sure you include it consistently.
3 Practical Methods for Structuring Margin in Restoration
Here are three common ways to apply margins, based on my real-world experience in the field.
Method 1 – Built-In Labor Margin
With this method, you fold your target margin into the labor rate that appears on every line item of your estimate.
Let’s use some example numbers. Here’s what you need for this margin calculation:
Illustrative purposes only
Let’s say our Budgeted Gross Margin Target is 40%:
- Budgeted Net Profit % + Budgeted Overhead % = 40% Budgeted Gross Margin Target
Scenario Consideration: Finish Carpentry costs are 50% labor and 50% material AND there is a 20% Markup at the end of the estimate (16.67% Margin).

💡Margin v Markup Reminder
If you’re wondering why 20% markup equals 16.67% margin, here’s why:
Let’s say our Cost is $100 and we want a Markup of 20%.
We take ($100 x 0.20) to get a markup of $20.
The Sale Price becomes $120.
To calculate our margin, we divide the Markup by the Sale Price:
- $20 ÷ $120 = 0.1667 (or 16.67%)
Therefore, Margin = Markup ÷ Sale Price.
Back to our example:
- Because half of our cost only has a 16.67% margin, the labor needs to be 63.33% in order to get the total of 40% as the target margin between both labor and material.
- (Labor Margin + Material Margin) ÷ 2 = 40
- (Labor Margin + 16.67) ÷ 2 = 40
- Labor Margin + 16.67 = 80
- Labor Margin = 63.33%
- Then we subtract 16.67% from 63.33% (the 16.67% is added at the end of the estimate from the 20% markup) to get 46.66% built-in labor margin.
- We need that margin added to our $45 per hour labor cost.
- Say our Base wage + Labor burden = $45
- Say our Base wage + Labor burden = $45
- The final hourly calculation would give us $45 ÷ .4666 = $96.44
💡 What’s labor burden?
Labor burden is the true cost of employing labor beyond base wages, all the additional expenses a company pays to keep an employee on payroll. This can look like:
- Payroll taxes (Social Security, Medicare, unemployment taxes)
- Workers’ compensation insurance
- Health, dental, and retirement benefits
- Paid time off (vacation, holidays, sick leave)
- Training and onboarding costs
- Uniforms, tools, and equipment
This way, the labor rate becomes a component of the line item. It allows a portion of the margin to be built into the line item and a portion of the margin to be in the markup at the end of an estimate.
One may also add the entire margin into the line item with no markup at the end of the estimate.
- Pros: When included in the line items, customers are more accustomed to this method. It doesn’t cause sticker shock like adding the entire margin at the end. It allows the potential to beat labor yield and make a better margin.
- Cons: Takes more time and a complicated algorithm to determine the correct margin for each trade and what to add to the labor rate. There is also a potential to go over the labor yield which would make less margin. It is completely dependent on the economies of scale of the labor yield.
Method 2 – End-of-Estimate Margin
In this method, you don’t build margin into each line item. Instead, you calculate all your job costs first, then add your margin all as a markup percentage at the end of the estimate.
Again, let’s use some example numbers. Here’s what you need for an end-of-estimate calculation:
For Illustrative Purposes Only
Let’s say our Budgeted Gross Margin Target is 40%:
- Budgeted Net Profit % + Budgeted Overhead % = 40% Budgeted Gross Margin Target
- Labor cost = $4,000
- Material cost = $2,000
- Total costs = ($4,000 + 2,000) = $6,000
- 40% Margin = 66.67% Markup
💡Margin v Markup Reminder
If you’re wondering why 40% margin equals 66.67% markup, here’s why:
Markup = Margin ÷ (1 - Margin)
So for a 40% margin (0.40):
Markup = 0.4 ÷ (1 - 0.4) = 0.6667 = 66.67%
Then we take our total costs and multiply it by the markup:
- $6,000 x 66.67% = $4,000.20
- $6,000 + $4,000.02 = $10,000.02 Sales price

- Pros: Transparent, easier to adjust.
- Cons: More likely to be negotiated down. It can sticker shock the customer. It’s like if you were to go to a store, and see the cost of a shirt is only $10, then see a markup of $6.67 for a total of the $16.67 sale price.
Method 3 – Time & Materials Approach
With this approach, you track the real hours your team works and the actual cost of materials, then apply your margin on top.
Again, using example numbers, here’s what you’d need for a Time & Materials calculation:
Illustrative purposes only
Let’s say our Budgeted Gross Margin Target is 40%:
- Budgeted Net Profit % + Budgeted Overhead % = 40% Budgeted Gross Margin Target
Scenario Consideration: Finish Carpentry costs are 50% labor and 50% material AND there is a 20% Markup at the end of the estimate (16.67% Margin).
💡Margin v Markup Reminder
If you’re wondering why 20% markup equals 16.67% margin, here’s why:
Let’s say our Cost is $100 and we want a Markup of 20%.
We take ($100 x 0.20) to get a markup of $20.
The Sale Price becomes $120.
To calculate our margin, we divide the Markup by the Sale Price:
- $20 ÷ $120 = 0.1667 (or 16.67%)
Therefore, Margin = Markup ÷ Sale Price.
We refer back to a similar calculation as our Built-In Labor Margin breakdown above:
- Because half of our cost only has a 16.67% margin, the labor needs to be 63.33% in order to get the total of 40% as the target margin between both labor and material.
- (Labor Margin + Material Margin) ÷ 2 = 40
- (Labor Margin + 16.67) ÷ 2 = 40
- Labor Margin + 16.67 = 80
- Labor Margin = 63.33%
- Then we subtract 16.67% from 63.33% (the 16.67% is added at the end of the estimate from the 20% markup) to get 46.66% built-in labor margin.
- We need that margin added to our $45 per hour labor cost.
- Say our Base wage + Labor burden = $45
- Say our Base wage + Labor burden = $45
- The final hourly calculation would give us $45 ÷ .4666 = $96.44
Then we add on our Time & Materials, let’s say we’re projecting 100 hours and your materials cost is $4,800:
- Our labor price becomes $96.44 x 100 hours = $9,644
- Our material cost with markup becomes ($4,800) x 20% = $5,760
- Our sales price becomes: $9,644 + $5,760 = $15,404
Then we factor in our actual costs:
- Actual Labor cost $45 x 100 = $4,500
- Actual Material cost = $4,800
- Total Actual Labor and Material Cost: $9,300
So our Time and Materials Margin is:
- Total Billed ($15,404) - Actual Cost ($9,300) = $6,104
- $6,104 ÷ 15,404 = 40% margin
This way, the customer pays based on what was truly used, and your profit is protected as long as the documentation is accurate.
- Pros: You’ll always make a margin. As costs go up, your margin will stay the same because you are billing for every hour. It’s not dependent on the economies of scale of labor yields in unit pricing.
- Cons: All costs must be documented in order to be paid. No opportunity to make a higher margin than the target because it does not beat a set number of hours as a unit cost would.
All Methods At a Glance
No matter which method you choose, the important thing is consistency. The real goal is to ensure that every job returns the margin you need, rather than relying on the software's defaults.
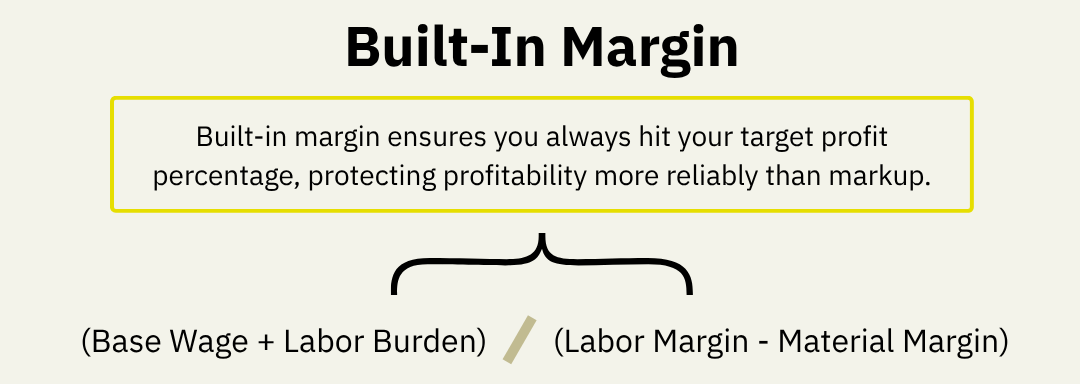
Built-In Labor Margin
Formula: (Base Wage + Labor Burden) ÷ (Labor Margin - Material Margin)
What it Represents: The labor rate becomes a component of the line item. It allows a portion of the margin to be built into the line item and a portion of the margin to be in the markup at the end of an estimate.
End-of-Estimate Margin
Formula: (Labor + Material Cost) + ((Labor + Material Cost) x Markup)
What it Represents: Shows the actual margin percentage based on the final estimate once all labor, material, subs, and overhead are included.
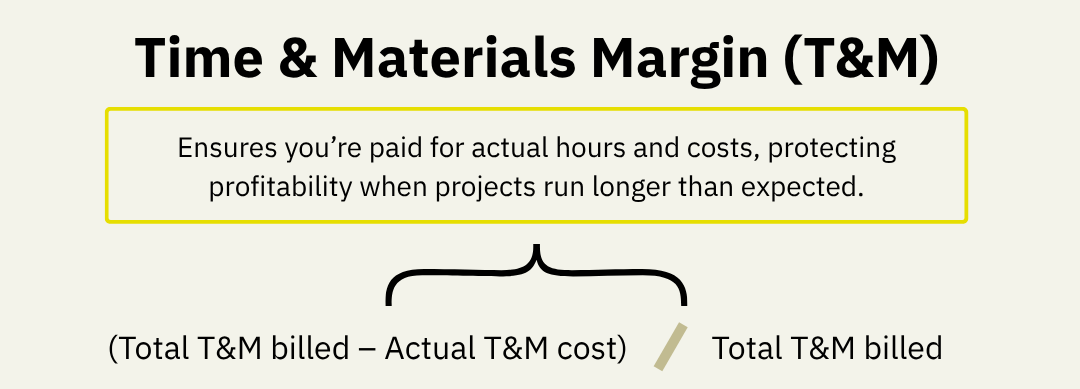
Time & Materials Margin
Formula: (Total T&M Billed – Actual T&M Cost) ÷ Total T&M Billed
What it Represents: Measures the margin achieved on a time & materials job, comparing what was billed vs. what it actually cost.
How to Improve Profit Margins in Restoration: Operational Strategies
Margins aren’t just about numbers on paper. They’re also about how you run your jobs day to day.
Improve Job Cost Accuracy
Regularly compare estimated costs to actual costs. If you see a gap, figure out why. Was labor underestimated? Were materials missed? Use those insights to improve future estimates.
Speed Up and Standardize Documentation and Estimating
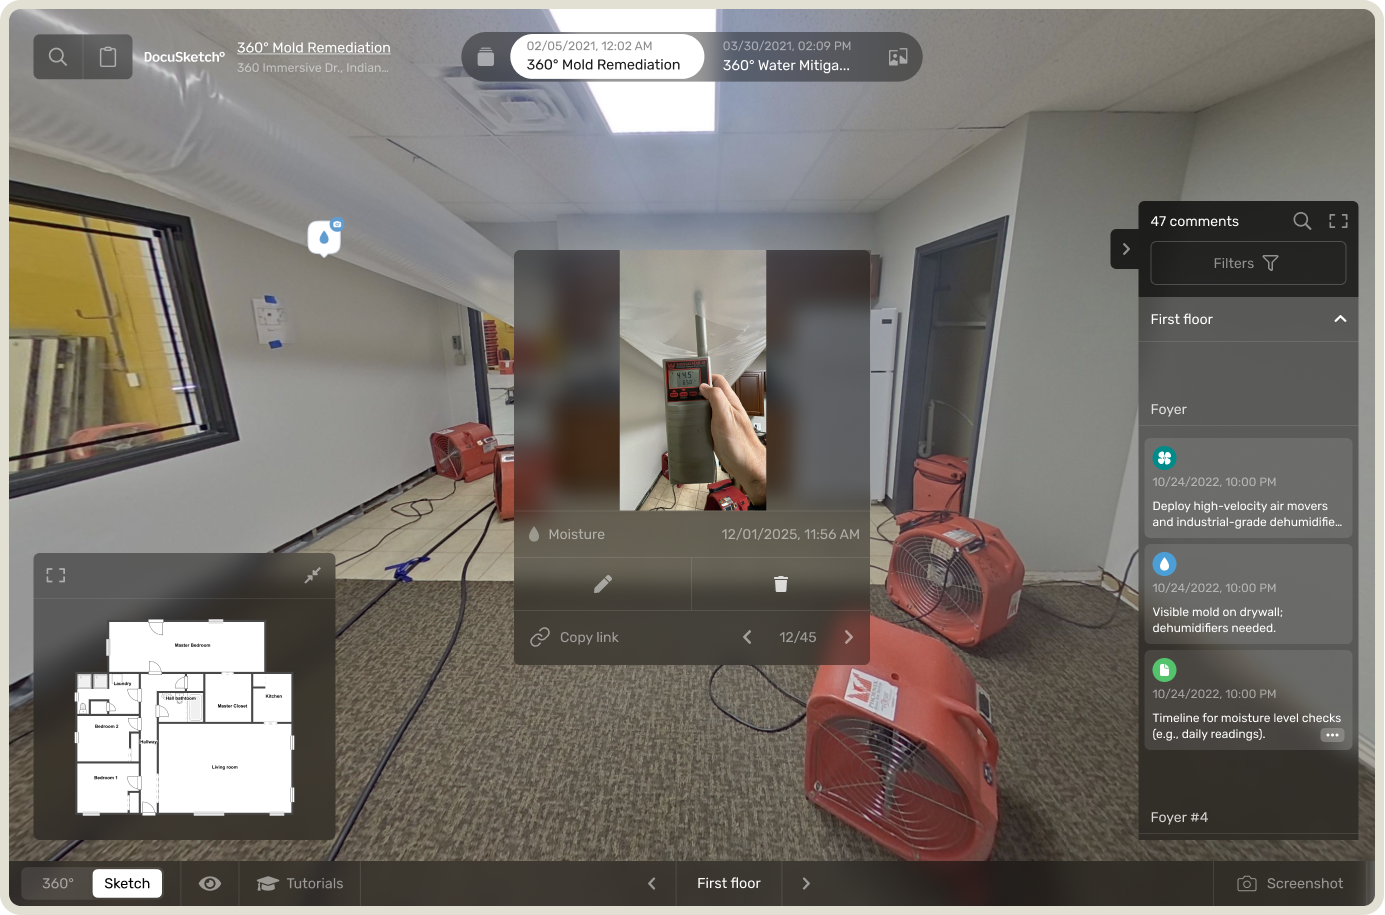
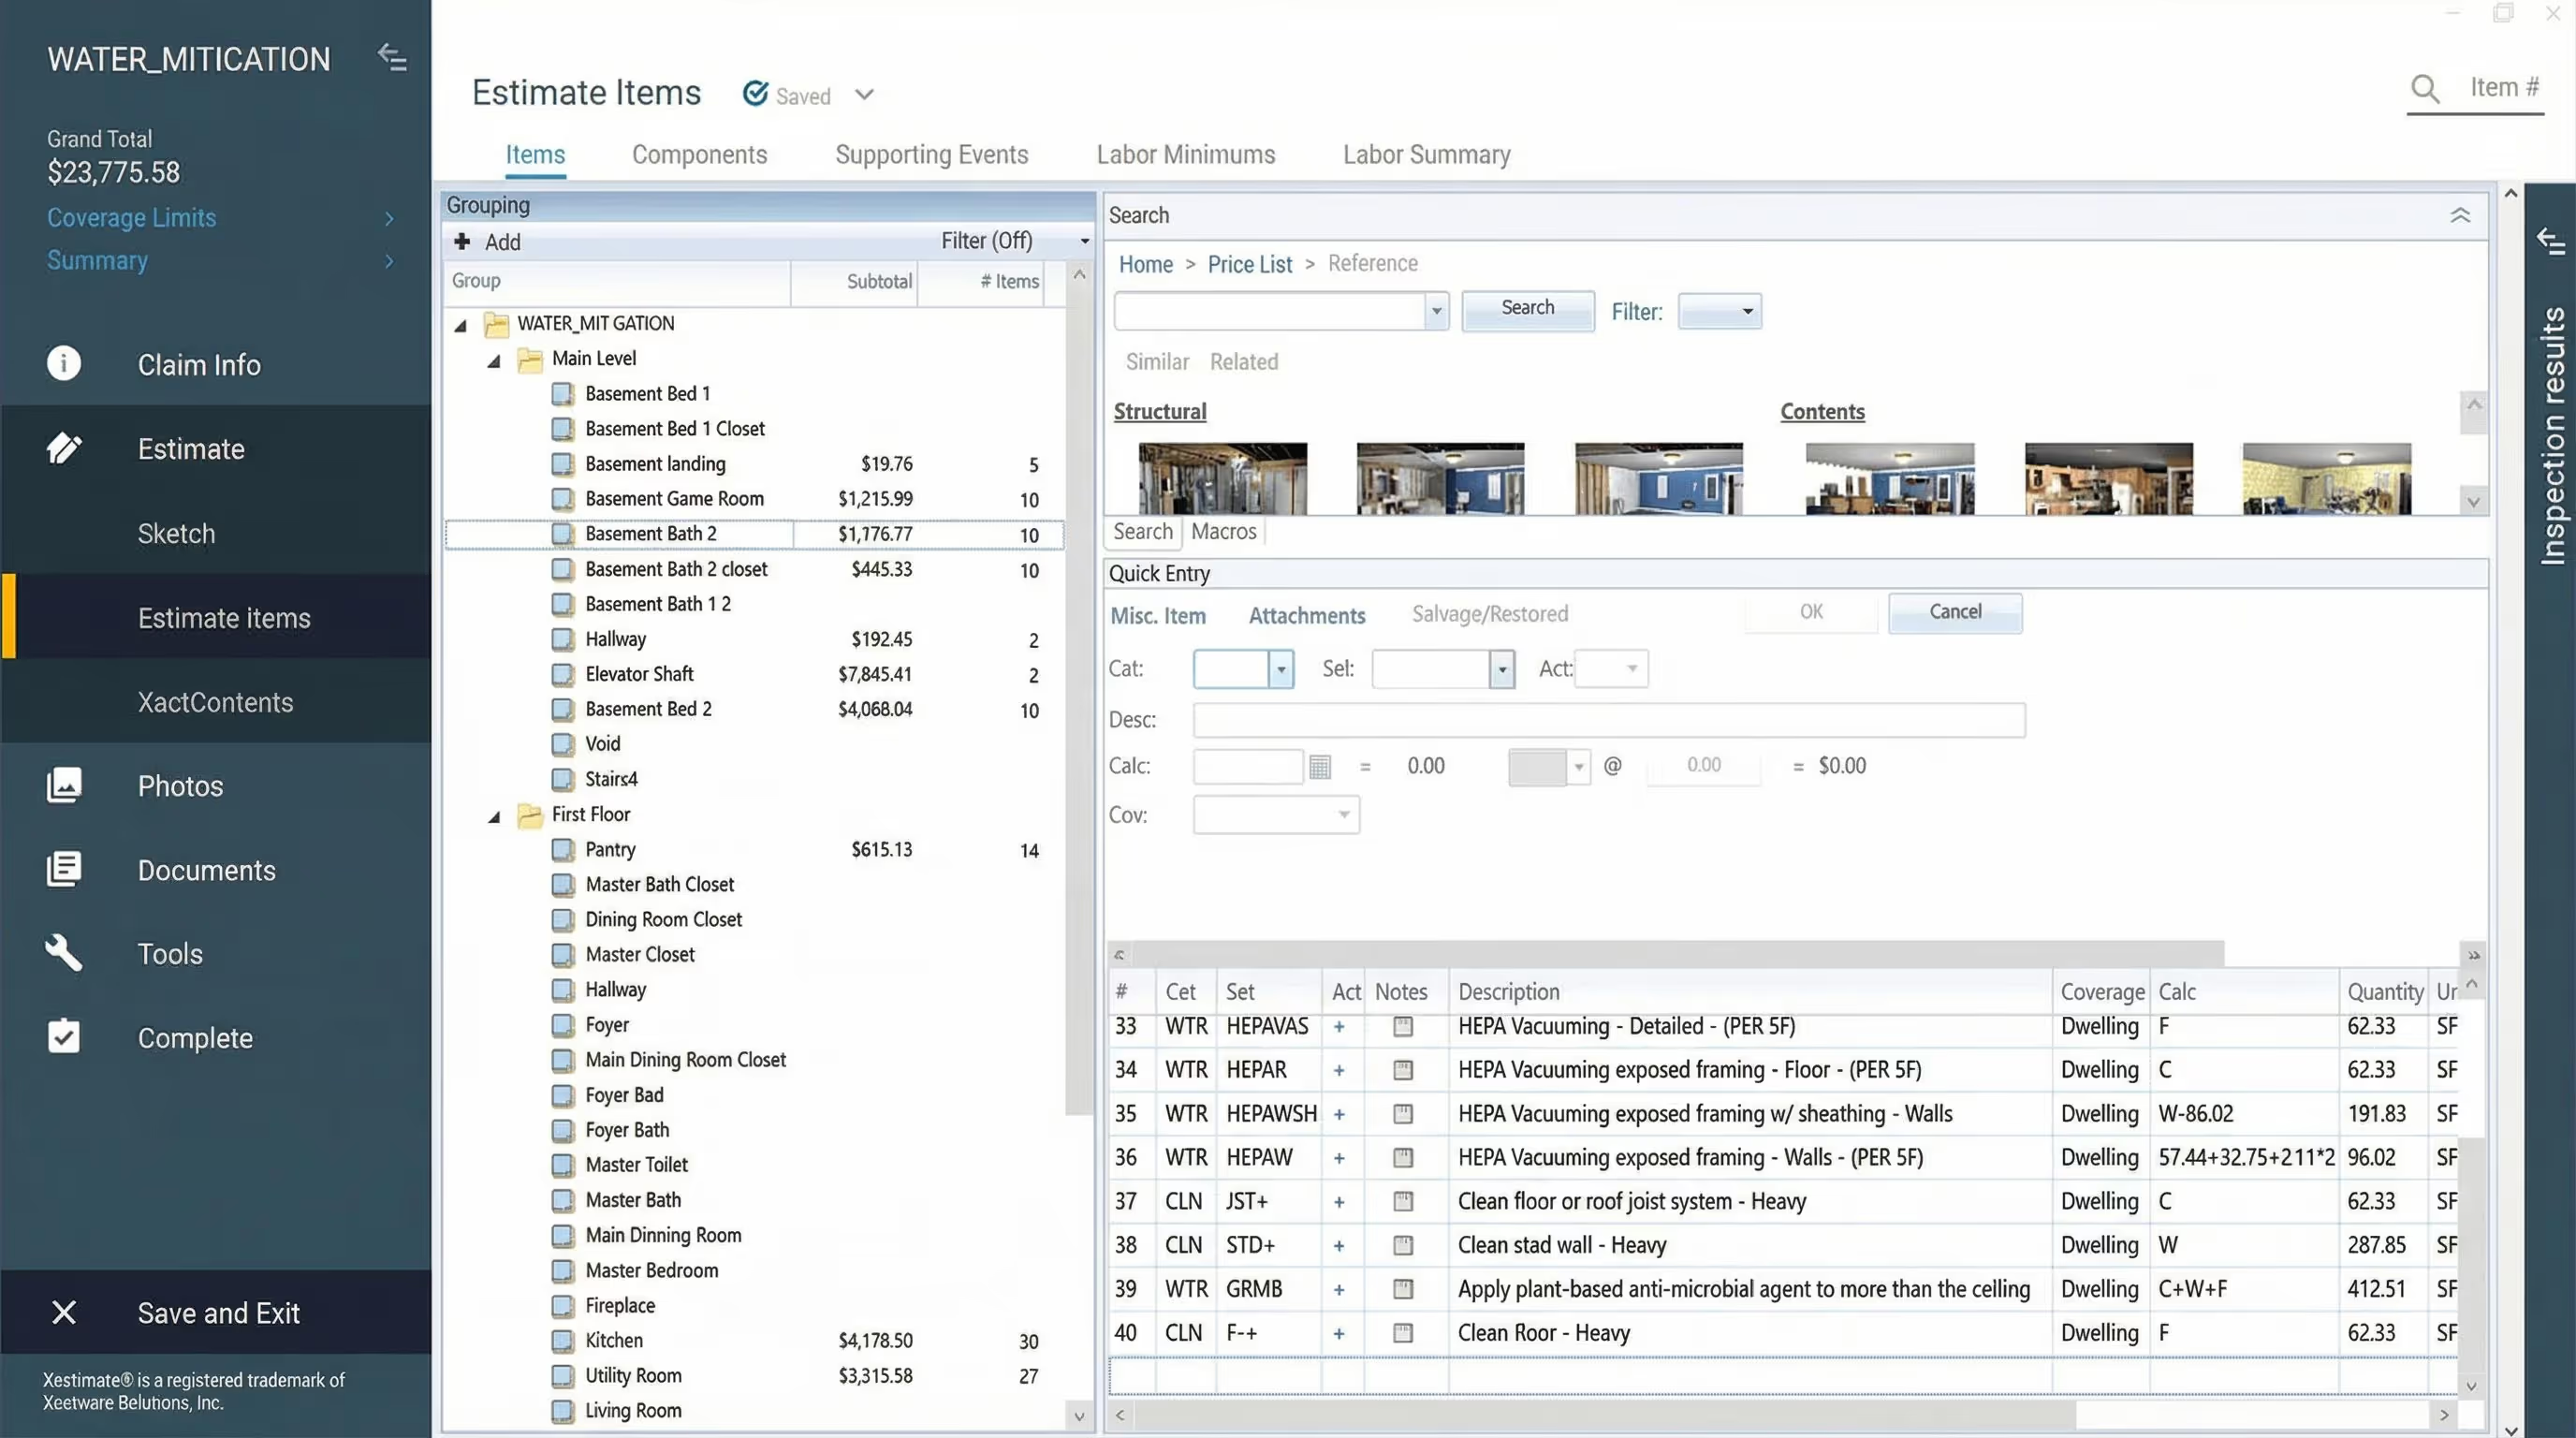
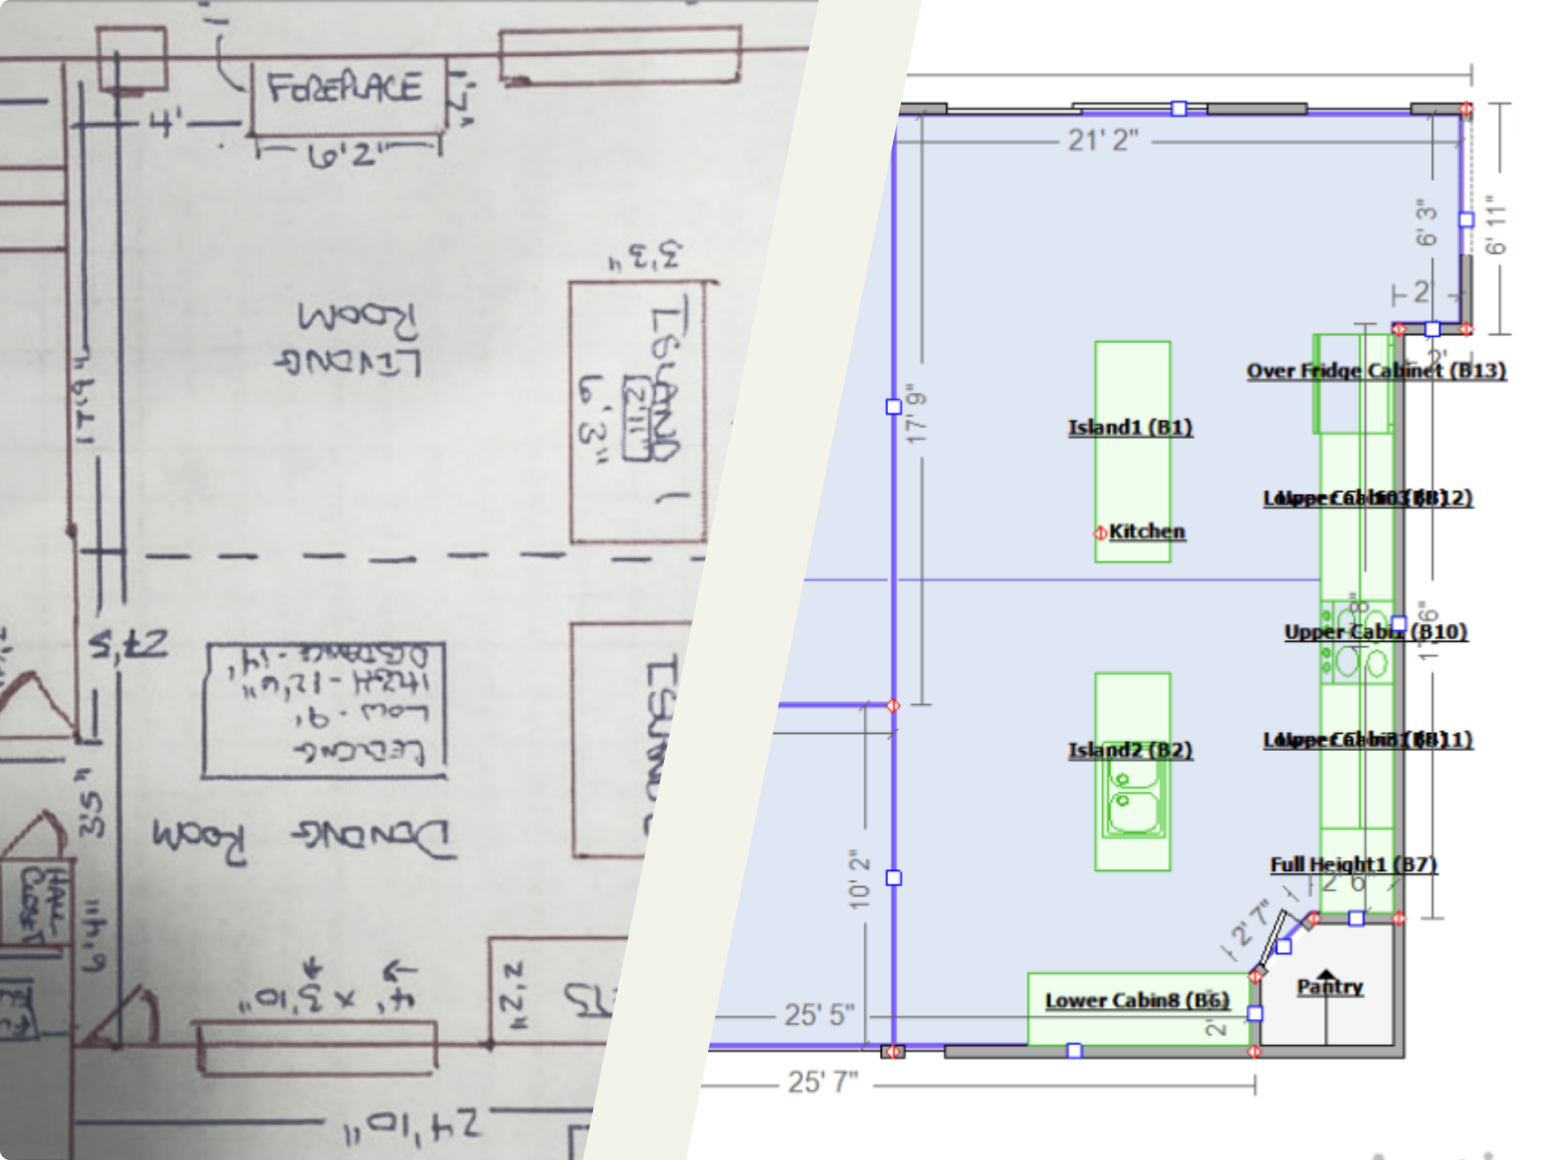
Every delay costs money. Slow documentation leads to slower approvals, which ties up cash flow and eats into profit. This is where DocuSketch makes a real difference.
With DocuSketch, you can capture immersive 360° documentation of every job site in minutes. From that documentation, you can quickly and accurately generate floor plans. And by building clear estimates from the start, you speed up claim times and reduce the back-and-forth that eats into margins.
Better documentation means better margins. Choosing the best restoration management software options can also help standardize how you track jobs, cut delays, and protect profitability.
Train Teams on Margin Awareness
Margins aren’t just for owners to worry about. Everyone on the team should understand how their work impacts profitability. Technicians who know why accurate measurements matter will ensure everything is documented properly or double-check the numbers, saving hours of rework later.
Common Mistakes That Undermine Profit Margins
In my experience, here are some of the most common traps restoration businesses fall into:
- Using markup instead of margin to set prices. This is a problem because markup is based on cost, while margin is based on the final price.
- Failing to account for all overhead costs.
- Incomplete documentation that slows down approvals, DocuSketch can help here.
- Skipping post-job profitability reviews.
Avoiding these mistakes can make the difference between breaking even and building a business that grows year after year.
Want to See How DocuSketch Can Help You Capture More Profit Per Job?
Every missed measurement or incomplete file chips away at your margin. With DocuSketch, you can document jobs quickly, generate accurate sketches, and get approvals faster. That means fewer delays, stronger margins, and more profit per project.
If you’re thinking about how to grow your restoration business beyond margins, check out our guide to marketing strategies for restoration businesses.
And if you’re ready to see how better documentation can protect your margins, book a demo today and discover how DocuSketch can help you protect your bottom line.
Want to Keep Learning?
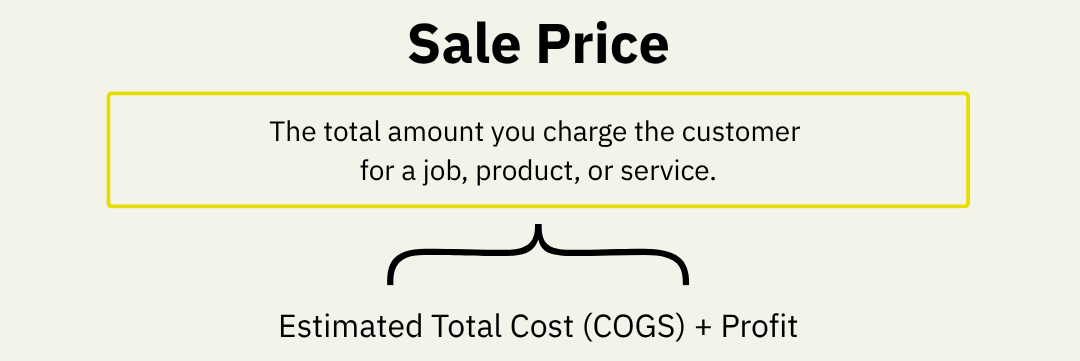
Key Definitions
Markup
The percentage added to your total cost to determine the selling price.
Formula: (Profit ÷ Cost) × 100
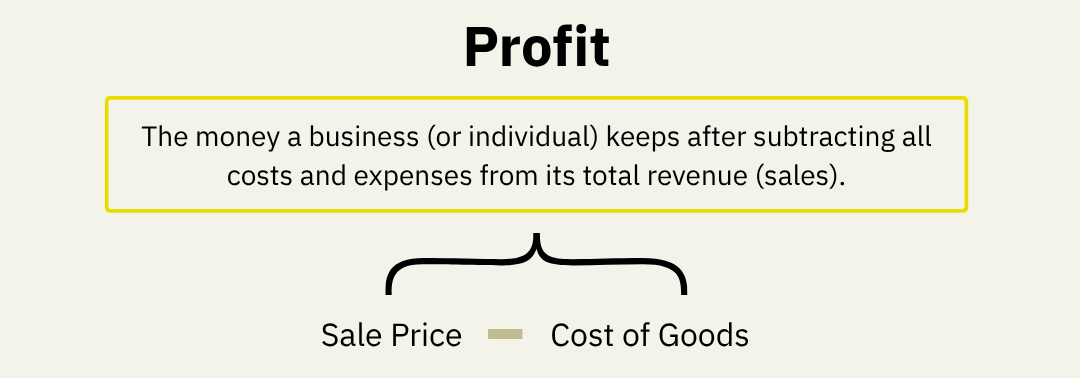
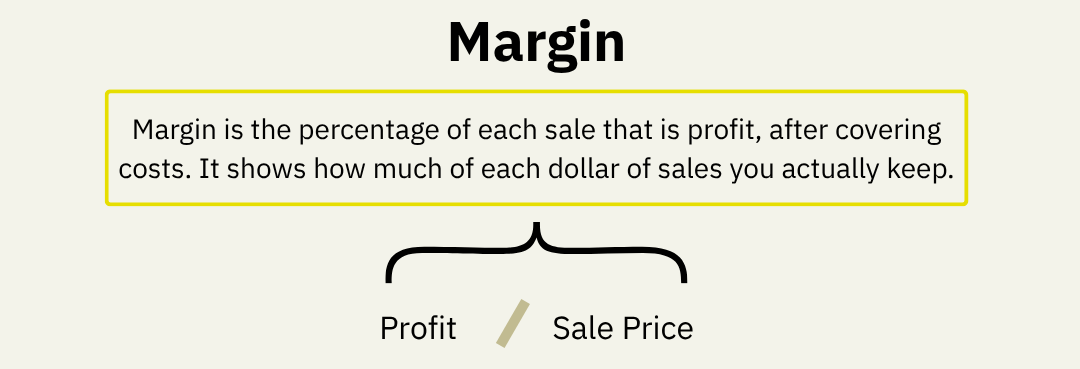
Margin (Gross Margin)
The percentage of sales revenue that remains after deducting all costs. It shows how much profit you make from each sale.
Formula: (Profit ÷ Sales Price) × 100
Profit
The amount left after subtracting all costs (labor, materials, overhead) from your total revenue.
Formula: Sales Price – Total Cost
Overhead
Ongoing business expenses not directly tied to a specific job, like rent, utilities, software, admin salaries, and insurance.
Labor Burden
The true cost of employing someone beyond their hourly wage, including taxes, benefits, insurance, paid time off, training, and equipment.
Budgeted Gross Margin Target
The margin percentage your business aims to achieve after covering both overhead and net profit.
Formula: Budgeted Net Profit % + Budgeted Overhead %
Built-In Labor Margin
A pricing method where your target margin is already included in the labor rate for each line item, rather than added at the end of the estimate.
End-of-Estimate Margin
A pricing method that applies the entire markup percentage after all labor and material costs are totaled, at the end of an estimate.
Time & Materials (T&M)
A pricing method where you charge based on the actual time worked and materials used, plus your margin.
Labor Yield
A measure of how efficiently your labor hours generate profit compared to your estimates, if your team completes work faster than estimated, your margin increases.
Break-Even Point
The amount of revenue needed to cover all costs (labor, material, and overhead). Beyond this point, every dollar earned contributes to profit.
Sticker Shock
Customer reaction when markup is applied visibly at the end of an estimate, making the price appear higher than expected.
Economies of Scale
When a business becomes more efficient and profitable as it grows, larger volume allows fixed costs to be spread across more jobs, improving margin.
Profit margins are the lifeline of every restoration company. They tell you if the work you’re doing is actually building a healthy business or just keeping the lights on. The challenge is that too many owners confuse markup with margin. It may seem like a minor detail, but this misunderstanding can lead to undercharging, weaker profits, and difficulty covering overhead.
I’ll explain how to set margins properly and walk through three practical ways to structure them. You’ll also see how streamlining your documentation and estimating process can protect margins and free your team to focus on the work instead of rework. Setting margins correctly is one of the most important ways to grow your restoration business.
Understanding Markup vs. Margin: Why It Matters More Than You Think
Definitions and Differences
Markup is based on cost. Margin is based on the revenue/sales price.
Here’s a simple example:
Cost of goods = $100.
Add a 10% markup to reach your sale price = $110.
Profit = Sale Price - Cost of Goods. In this case, profit = $9.00
Margin = Profit ÷ Sale Price. In this case, margin = 9%.
So, while your markup is 10%, your margin is only 9%. That 1% difference may not seem like much, but across hundreds of jobs, it adds up quickly.
Still unclear? Take a look at my recent LinkedIn post, where I break it down with a short video explainer that brings the numbers to life.
Why This Misunderstanding Hurts Restoration Business Owners
When restoration businesses use markup to set prices, they often miss their true margin target. The result is slimmer profits and a constant struggle to stay ahead of rising costs.
How to Set Profit Margins in Your Restoration Business
Start With Cost Clarity
You can’t set a healthy margin until you know your true costs. That includes labor and benefits, materials and equipment, administrative expenses, and overhead like rent, utilities, and software. Add those up to find your break-even point. From there, you can decide how much you need to charge to stay profitable.
Define Your Target Margin
There’s no one-size-fits-all margin. Smaller companies that operate from a garage may run lean, while established firms with full-time staff and office space carry more overhead. Most healthy restoration businesses aim for margins that allow them to reinvest in growth and absorb unexpected costs. The important thing is to know your numbers instead of copying what “everyone else” does.
Choose a Margin Strategy
Once you know your costs and target, you can choose a strategy for applying margin. Some businesses prefer to build it into labor rates. Others apply it at the end of an estimate. Some use time and materials. The method matters less than making sure you include it consistently.
3 Practical Methods for Structuring Margin in Restoration
Here are three common ways to apply margins, based on my real-world experience in the field.
Method 1 – Built-In Labor Margin
With this method, you fold your target margin into the labor rate that appears on every line item of your estimate.
Let’s use some example numbers. Here’s what you need for this margin calculation:
Illustrative purposes only
Let’s say our Budgeted Gross Margin Target is 40%:
- Budgeted Net Profit % + Budgeted Overhead % = 40% Budgeted Gross Margin Target
Scenario Consideration: Finish Carpentry costs are 50% labor and 50% material AND there is a 20% Markup at the end of the estimate (16.67% Margin).
💡Margin v Markup Reminder
If you’re wondering why 20% markup equals 16.67% margin, here’s why:
Let’s say our Cost is $100 and we want a Markup of 20%.
We take ($100 x 0.20) to get a markup of $20.
The Sale Price becomes $120.
To calculate our margin, we divide the Markup by the Sale Price:
- $20 ÷ $120 = 0.1667 (or 16.67%)
Therefore, Margin = Markup ÷ Sale Price.
Back to our example:
- Because half of our cost only has a 16.67% margin, the labor needs to be 63.33% in order to get the total of 40% as the target margin between both labor and material.
- (Labor Margin + Material Margin) ÷ 2 = 40
- (Labor Margin + 16.67) ÷ 2 = 40
- Labor Margin + 16.67 = 80
- Labor Margin = 63.33%
- Then we subtract 16.67% from 63.33% (the 16.67% is added at the end of the estimate from the 20% markup) to get 46.66% built-in labor margin.
- We need that margin added to our $45 per hour labor cost.
- Say our Base wage + Labor burden = $45
- Say our Base wage + Labor burden = $45
- The final hourly calculation would give us $45 ÷ .4666 = $96.44
💡 What’s labor burden?
Labor burden is the true cost of employing labor beyond base wages, all the additional expenses a company pays to keep an employee on payroll. This can look like:
- Payroll taxes (Social Security, Medicare, unemployment taxes)
- Workers’ compensation insurance
- Health, dental, and retirement benefits
- Paid time off (vacation, holidays, sick leave)
- Training and onboarding costs
- Uniforms, tools, and equipment
This way, the labor rate becomes a component of the line item. It allows a portion of the margin to be built into the line item and a portion of the margin to be in the markup at the end of an estimate.
One may also add the entire margin into the line item with no markup at the end of the estimate.
- Pros: When included in the line items, customers are more accustomed to this method. It doesn’t cause sticker shock like adding the entire margin at the end. It allows the potential to beat labor yield and make a better margin.
- Cons: Takes more time and a complicated algorithm to determine the correct margin for each trade and what to add to the labor rate. There is also a potential to go over the labor yield which would make less margin. It is completely dependent on the economies of scale of the labor yield.
Method 2 – End-of-Estimate Margin
In this method, you don’t build margin into each line item. Instead, you calculate all your job costs first, then add your margin all as a markup percentage at the end of the estimate.
Again, let’s use some example numbers. Here’s what you need for an end-of-estimate calculation:
For Illustrative Purposes Only
Let’s say our Budgeted Gross Margin Target is 40%:
- Budgeted Net Profit % + Budgeted Overhead % = 40% Budgeted Gross Margin Target
- Labor cost = $4,000
- Material cost = $2,000
- Total costs = ($4,000 + 2,000) = $6,000
- 40% Margin = 66.67% Markup
💡Margin v Markup Reminder
If you’re wondering why 40% margin equals 66.67% markup, here’s why:
Markup = Margin ÷ (1 - Margin)
So for a 40% margin (0.40):
Markup = 0.4 ÷ (1 - 0.4) = 0.6667 = 66.67%
Then we take our total costs and multiply it by the markup:
- $6,000 x 66.67% = $4,000.20
- $6,000 + $4,000.02 = $10,000.02 Sales price
- Pros: Transparent, easier to adjust.
- Cons: More likely to be negotiated down. It can sticker shock the customer. It’s like if you were to go to a store, and see the cost of a shirt is only $10, then see a markup of $6.67 for a total of the $16.67 sale price.
Method 3 – Time & Materials Approach
With this approach, you track the real hours your team works and the actual cost of materials, then apply your margin on top.
Again, using example numbers, here’s what you’d need for a Time & Materials calculation:
Illustrative purposes only
Let’s say our Budgeted Gross Margin Target is 40%:
- Budgeted Net Profit % + Budgeted Overhead % = 40% Budgeted Gross Margin Target
Scenario Consideration: Finish Carpentry costs are 50% labor and 50% material AND there is a 20% Markup at the end of the estimate (16.67% Margin).
💡Margin v Markup Reminder
If you’re wondering why 20% markup equals 16.67% margin, here’s why:
Let’s say our Cost is $100 and we want a Markup of 20%.
We take ($100 x 0.20) to get a markup of $20.
The Sale Price becomes $120.
To calculate our margin, we divide the Markup by the Sale Price:
- $20 ÷ $120 = 0.1667 (or 16.67%)
Therefore, Margin = Markup ÷ Sale Price.
We refer back to a similar calculation as our Built-In Labor Margin breakdown above:
- Because half of our cost only has a 16.67% margin, the labor needs to be 63.33% in order to get the total of 40% as the target margin between both labor and material.
- (Labor Margin + Material Margin) ÷ 2 = 40
- (Labor Margin + 16.67) ÷ 2 = 40
- Labor Margin + 16.67 = 80
- Labor Margin = 63.33%
- Then we subtract 16.67% from 63.33% (the 16.67% is added at the end of the estimate from the 20% markup) to get 46.66% built-in labor margin.
- We need that margin added to our $45 per hour labor cost.
- Say our Base wage + Labor burden = $45
- Say our Base wage + Labor burden = $45
- The final hourly calculation would give us $45 ÷ .4666 = $96.44
Then we add on our Time & Materials, let’s say we’re projecting 100 hours and your materials cost is $4,800:
- Our labor price becomes $96.44 x 100 hours = $9,644
- Our material cost with markup becomes ($4,800) x 20% = $5,760
- Our sales price becomes: $9,644 + $5,760 = $15,404
Then we factor in our actual costs:
- Actual Labor cost $45 x 100 = $4,500
- Actual Material cost = $4,800
- Total Actual Labor and Material Cost: $9,300
So our Time and Materials Margin is:
- Total Billed ($15,404) - Actual Cost ($9,300) = $6,104
- $6,104 ÷ 15,404 = 40% margin
This way, the customer pays based on what was truly used, and your profit is protected as long as the documentation is accurate.
- Pros: You’ll always make a margin. As costs go up, your margin will stay the same because you are billing for every hour. It’s not dependent on the economies of scale of labor yields in unit pricing.
- Cons: All costs must be documented in order to be paid. No opportunity to make a higher margin than the target because it does not beat a set number of hours as a unit cost would.
All Methods At a Glance
No matter which method you choose, the important thing is consistency. The real goal is to ensure that every job returns the margin you need, rather than relying on the software's defaults.
Built-In Labor Margin
Formula: (Base Wage + Labor Burden) ÷ (Labor Margin - Material Margin)
What it Represents: The labor rate becomes a component of the line item. It allows a portion of the margin to be built into the line item and a portion of the margin to be in the markup at the end of an estimate.
End-of-Estimate Margin
Formula: (Labor + Material Cost) + ((Labor + Material Cost) x Markup)
What it Represents: Shows the actual margin percentage based on the final estimate once all labor, material, subs, and overhead are included.
Time & Materials Margin
Formula: (Total T&M Billed – Actual T&M Cost) ÷ Total T&M Billed
What it Represents: Measures the margin achieved on a time & materials job, comparing what was billed vs. what it actually cost.
How to Improve Profit Margins in Restoration: Operational Strategies
Margins aren’t just about numbers on paper. They’re also about how you run your jobs day to day.
Improve Job Cost Accuracy
Regularly compare estimated costs to actual costs. If you see a gap, figure out why. Was labor underestimated? Were materials missed? Use those insights to improve future estimates.
Speed Up and Standardize Documentation and Estimating
Every delay costs money. Slow documentation leads to slower approvals, which ties up cash flow and eats into profit. This is where DocuSketch makes a real difference.
With DocuSketch, you can capture immersive 360° documentation of every job site in minutes. From that documentation, you can quickly and accurately generate floor plans. And by building clear estimates from the start, you speed up claim times and reduce the back-and-forth that eats into margins.
Better documentation means better margins. Choosing the best restoration management software options can also help standardize how you track jobs, cut delays, and protect profitability.
Train Teams on Margin Awareness
Margins aren’t just for owners to worry about. Everyone on the team should understand how their work impacts profitability. Technicians who know why accurate measurements matter will ensure everything is documented properly or double-check the numbers, saving hours of rework later.
Common Mistakes That Undermine Profit Margins
In my experience, here are some of the most common traps restoration businesses fall into:
- Using markup instead of margin to set prices. This is a problem because markup is based on cost, while margin is based on the final price.
- Failing to account for all overhead costs.
- Incomplete documentation that slows down approvals, DocuSketch can help here.
- Skipping post-job profitability reviews.
Avoiding these mistakes can make the difference between breaking even and building a business that grows year after year.
Want to See How DocuSketch Can Help You Capture More Profit Per Job?
Every missed measurement or incomplete file chips away at your margin. With DocuSketch, you can document jobs quickly, generate accurate sketches, and get approvals faster. That means fewer delays, stronger margins, and more profit per project.
If you’re thinking about how to grow your restoration business beyond margins, check out our guide to marketing strategies for restoration businesses.
And if you’re ready to see how better documentation can protect your margins, book a demo today and discover how DocuSketch can help you protect your bottom line.
Want to Keep Learning?
Key Definitions
Markup
The percentage added to your total cost to determine the selling price.
Formula: (Profit ÷ Cost) × 100
Margin (Gross Margin)
The percentage of sales revenue that remains after deducting all costs. It shows how much profit you make from each sale.
Formula: (Profit ÷ Sales Price) × 100
Profit
The amount left after subtracting all costs (labor, materials, overhead) from your total revenue.
Formula: Sales Price – Total Cost
Overhead
Ongoing business expenses not directly tied to a specific job, like rent, utilities, software, admin salaries, and insurance.
Labor Burden
The true cost of employing someone beyond their hourly wage, including taxes, benefits, insurance, paid time off, training, and equipment.
Budgeted Gross Margin Target
The margin percentage your business aims to achieve after covering both overhead and net profit.
Formula: Budgeted Net Profit % + Budgeted Overhead %
Built-In Labor Margin
A pricing method where your target margin is already included in the labor rate for each line item, rather than added at the end of the estimate.
End-of-Estimate Margin
A pricing method that applies the entire markup percentage after all labor and material costs are totaled, at the end of an estimate.
Time & Materials (T&M)
A pricing method where you charge based on the actual time worked and materials used, plus your margin.
Labor Yield
A measure of how efficiently your labor hours generate profit compared to your estimates, if your team completes work faster than estimated, your margin increases.
Break-Even Point
The amount of revenue needed to cover all costs (labor, material, and overhead). Beyond this point, every dollar earned contributes to profit.
Sticker Shock
Customer reaction when markup is applied visibly at the end of an estimate, making the price appear higher than expected.
Economies of Scale
When a business becomes more efficient and profitable as it grows, larger volume allows fixed costs to be spread across more jobs, improving margin.

Related Articles


%20(1).jpg)